I’ve just got back from another Critically Ill Airway (CIA) course at The Alfred, run by intensivist Chris Nickson of LITFL. This packed two day course is designed for anaesthetic, emergency, intensive care and rural doctors and combines a multitude of hands-on task training with immersive simulation scenarios. Great fun and highly recommended, although heavy demand means that there is a wait list for places!
For the first time, I brought along the ‘SALAD sim’ – this is the brainchild of Milwaukee anaesthetist Dr James DuCanto; we’ve used it at smaccCHICAGO and smaccDUB airway workshops and it’s nice to see the paradigm being adopted by many enthusiasts around the globe.
Suction-assisted laryngscopic decontamination (SALAD) is a task-training technique to cope with massive emesis (whether vomit or blood). Instructions on how to make one have been well-described by the inventor, Dr DuCanto. See a guide here from Airwaynautics.
In past few months I’ve been looking to refine my version for easier transport and obviate problems of large pumps and power supplies. At the Critically Ill Airway course, several people asked me how to make one. Here’s a quick guide to parts.
The Compact Vomiquin
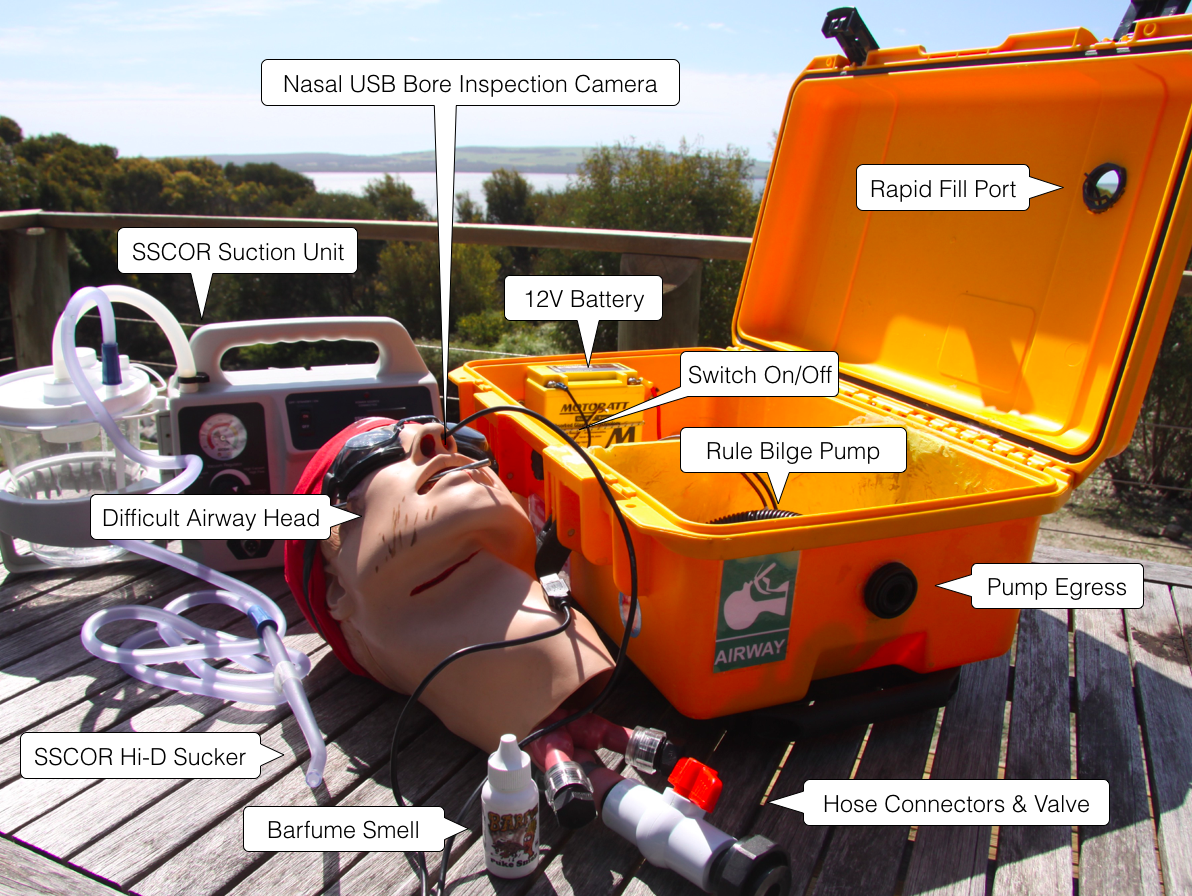
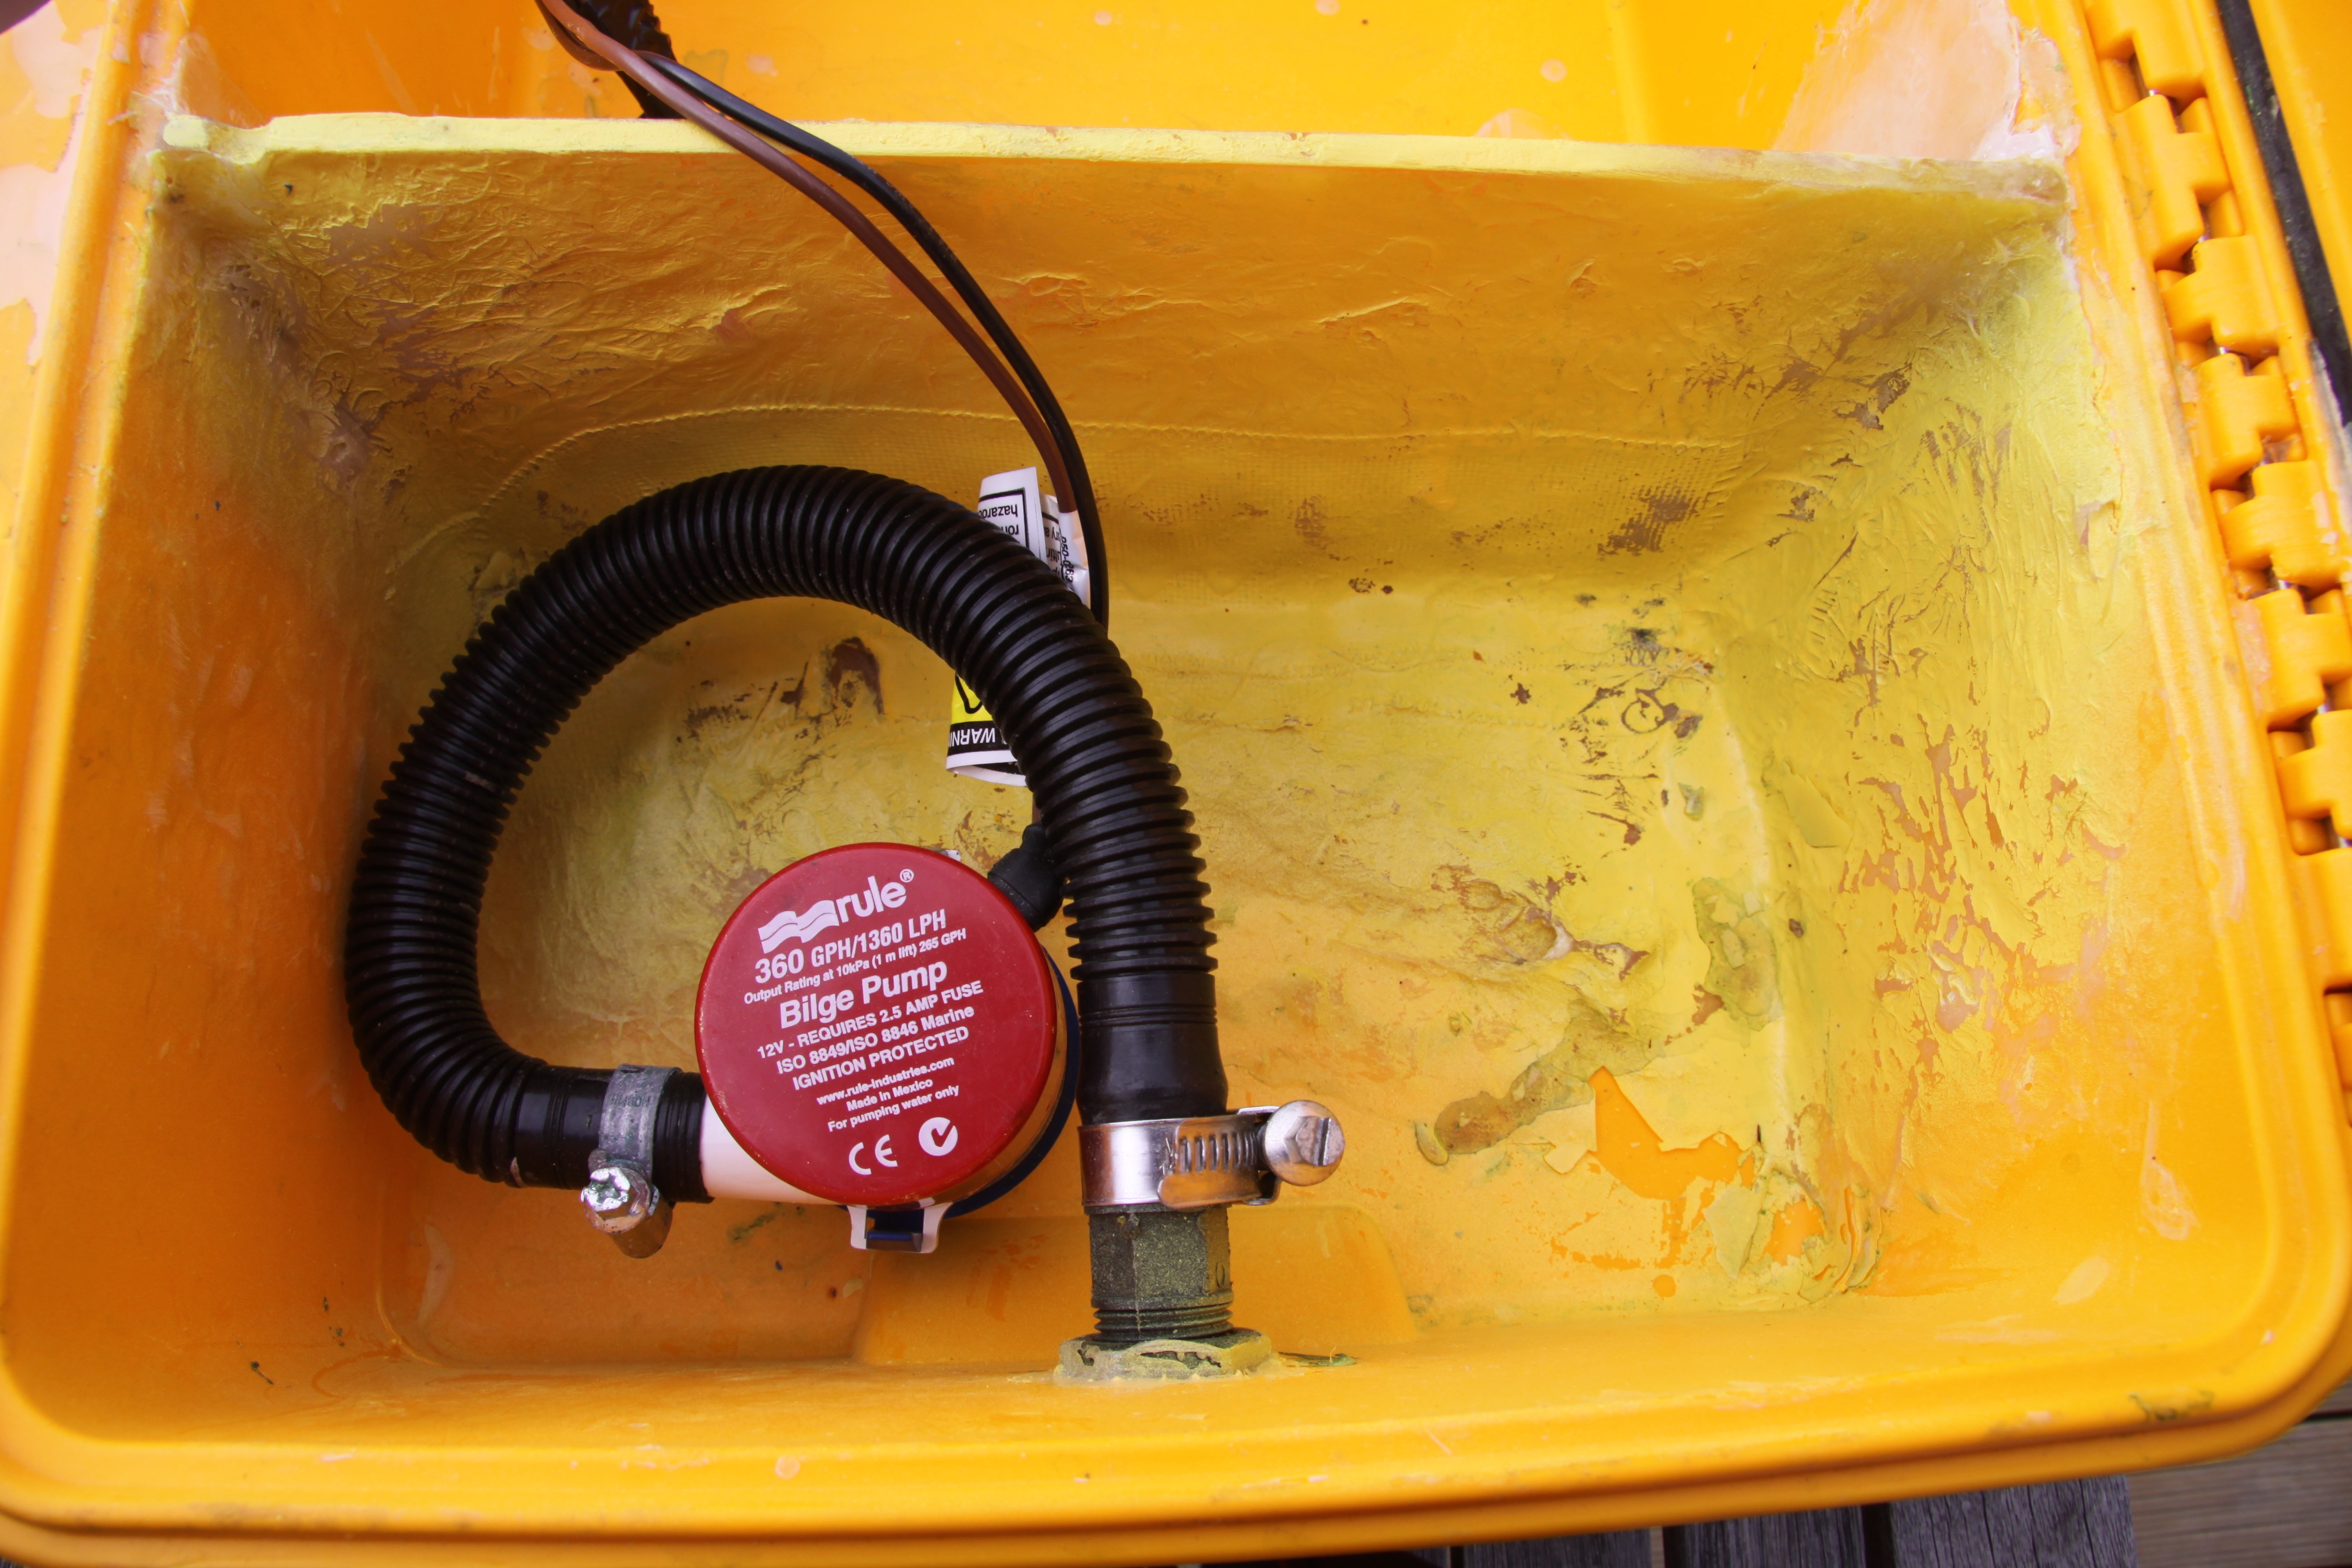
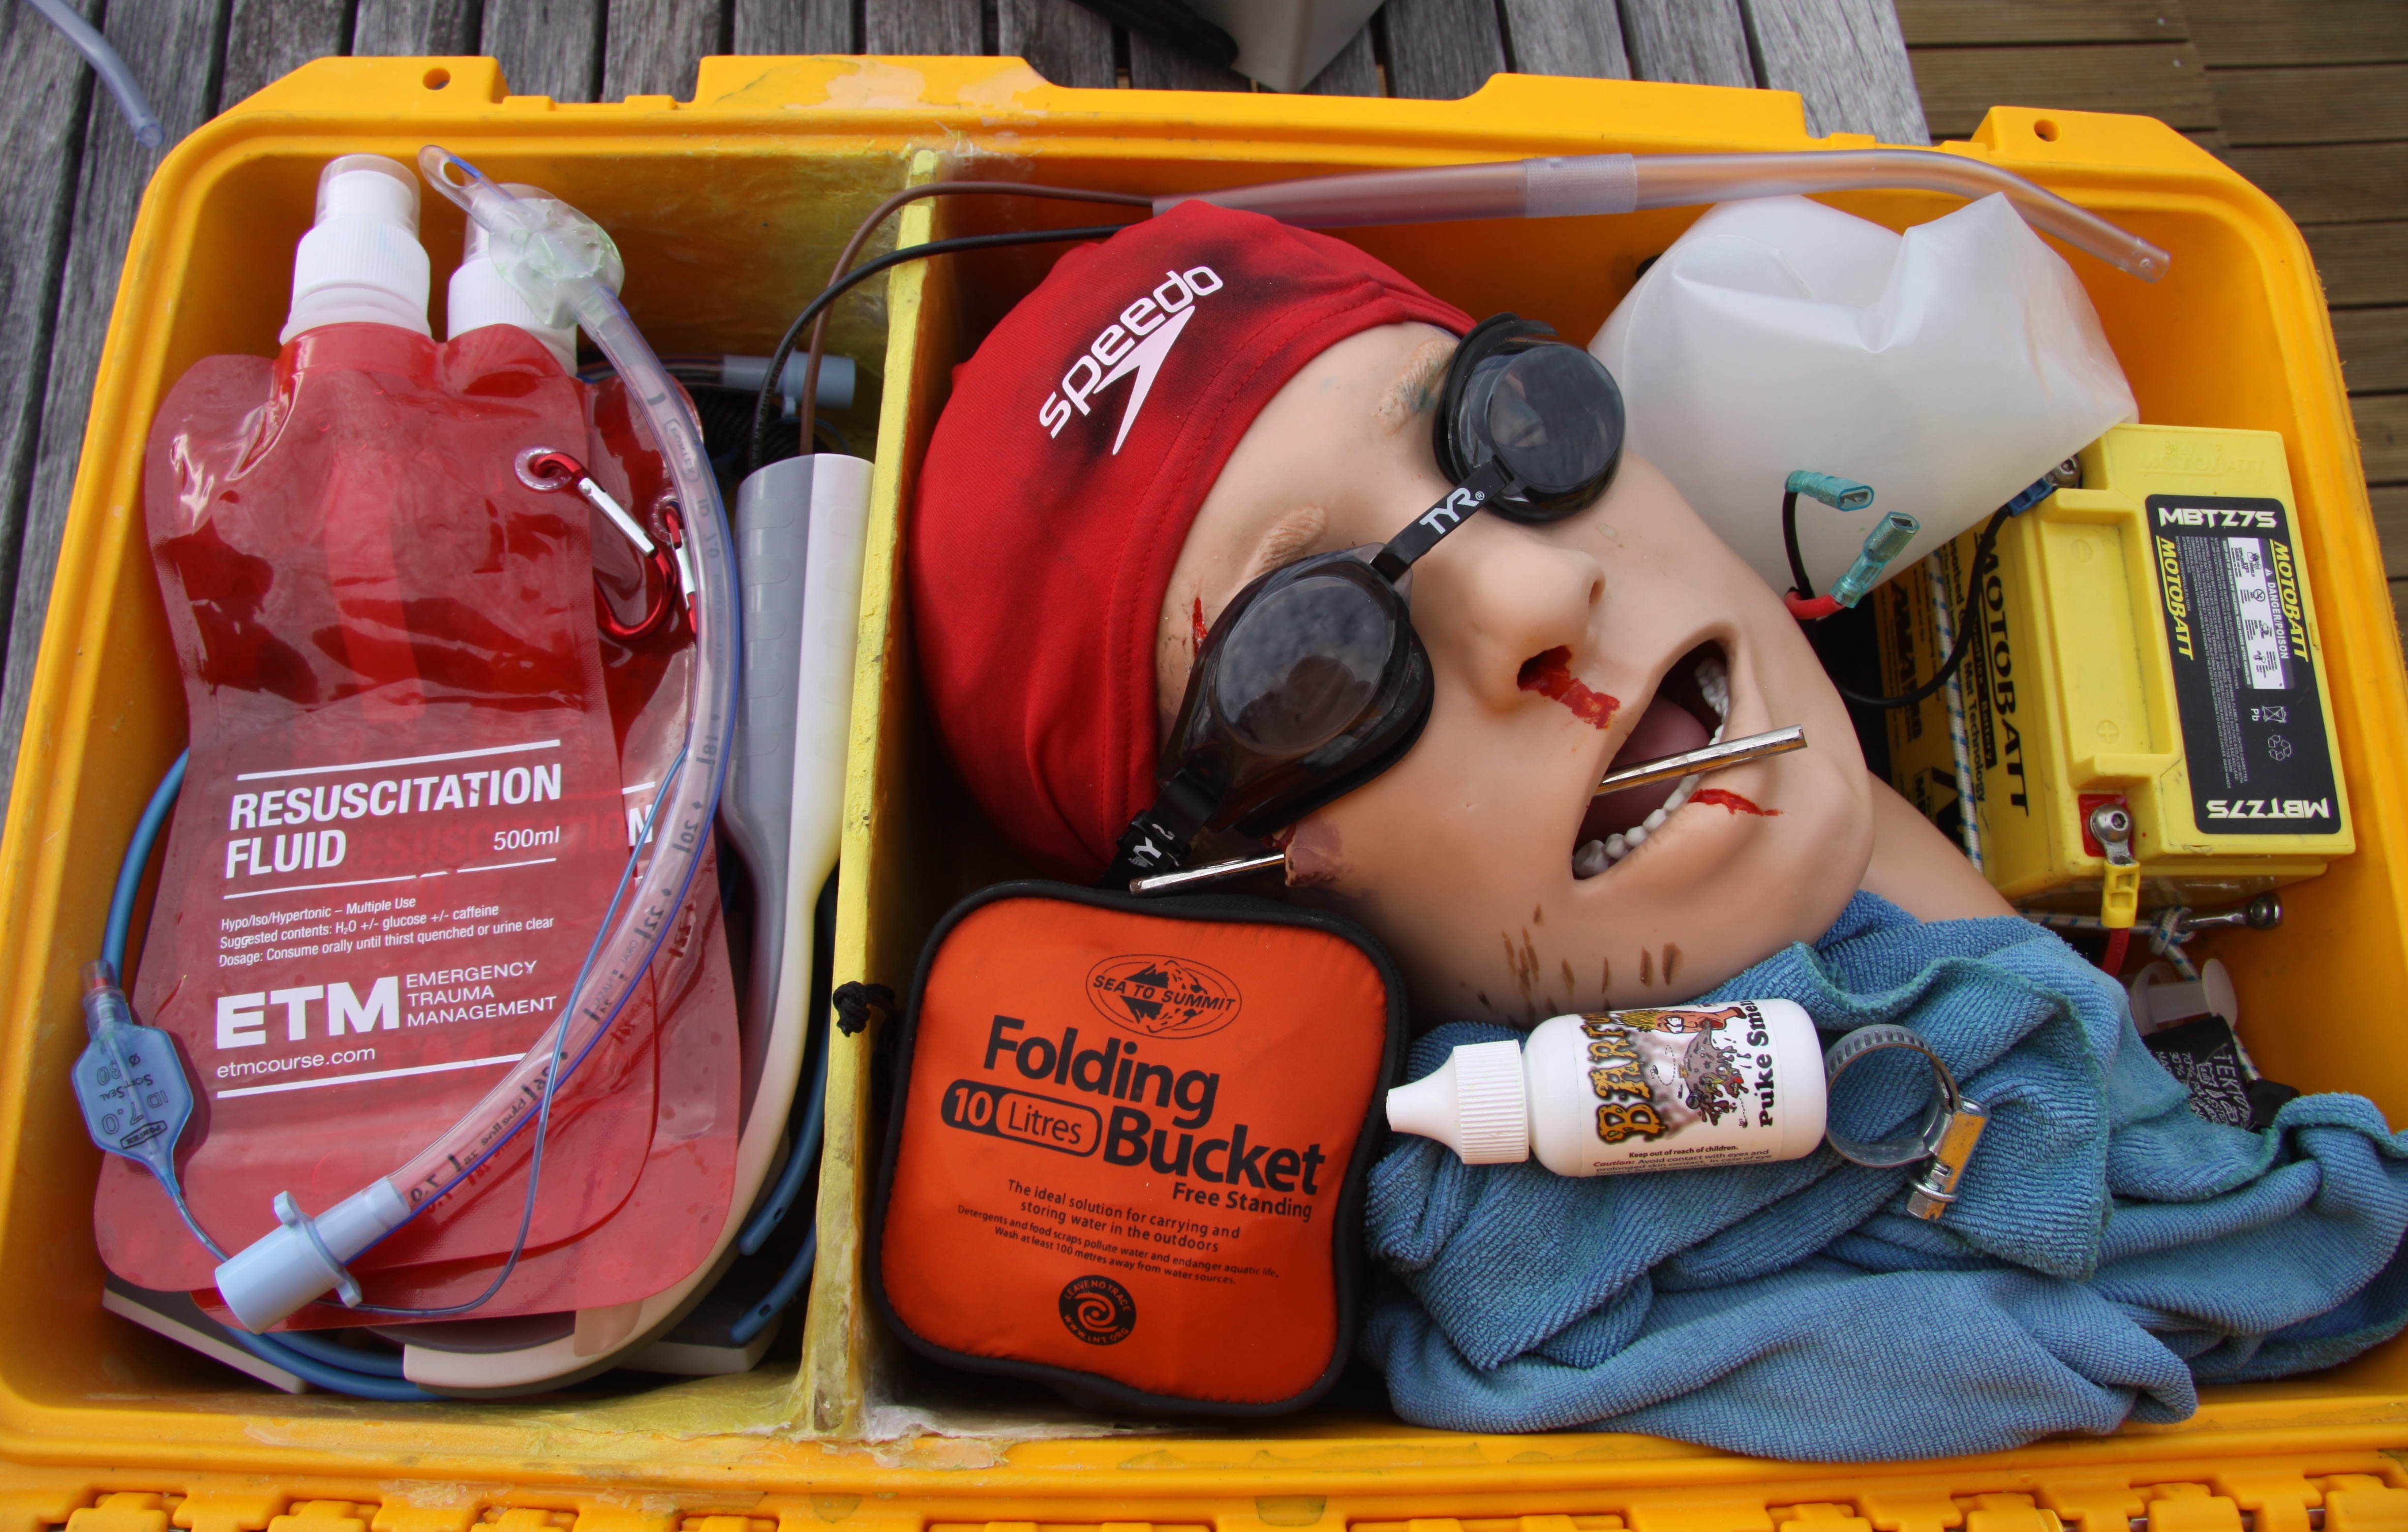
PELICAN STORM CASE IM2500
I like this case as it has wheels and a handle, making it useful for lugging around the countryside. It contains power supply, a bilge pump, on/off switch mounted in casing, reservoir for fluid and is large enough to carry airway head and assorted airway kit.
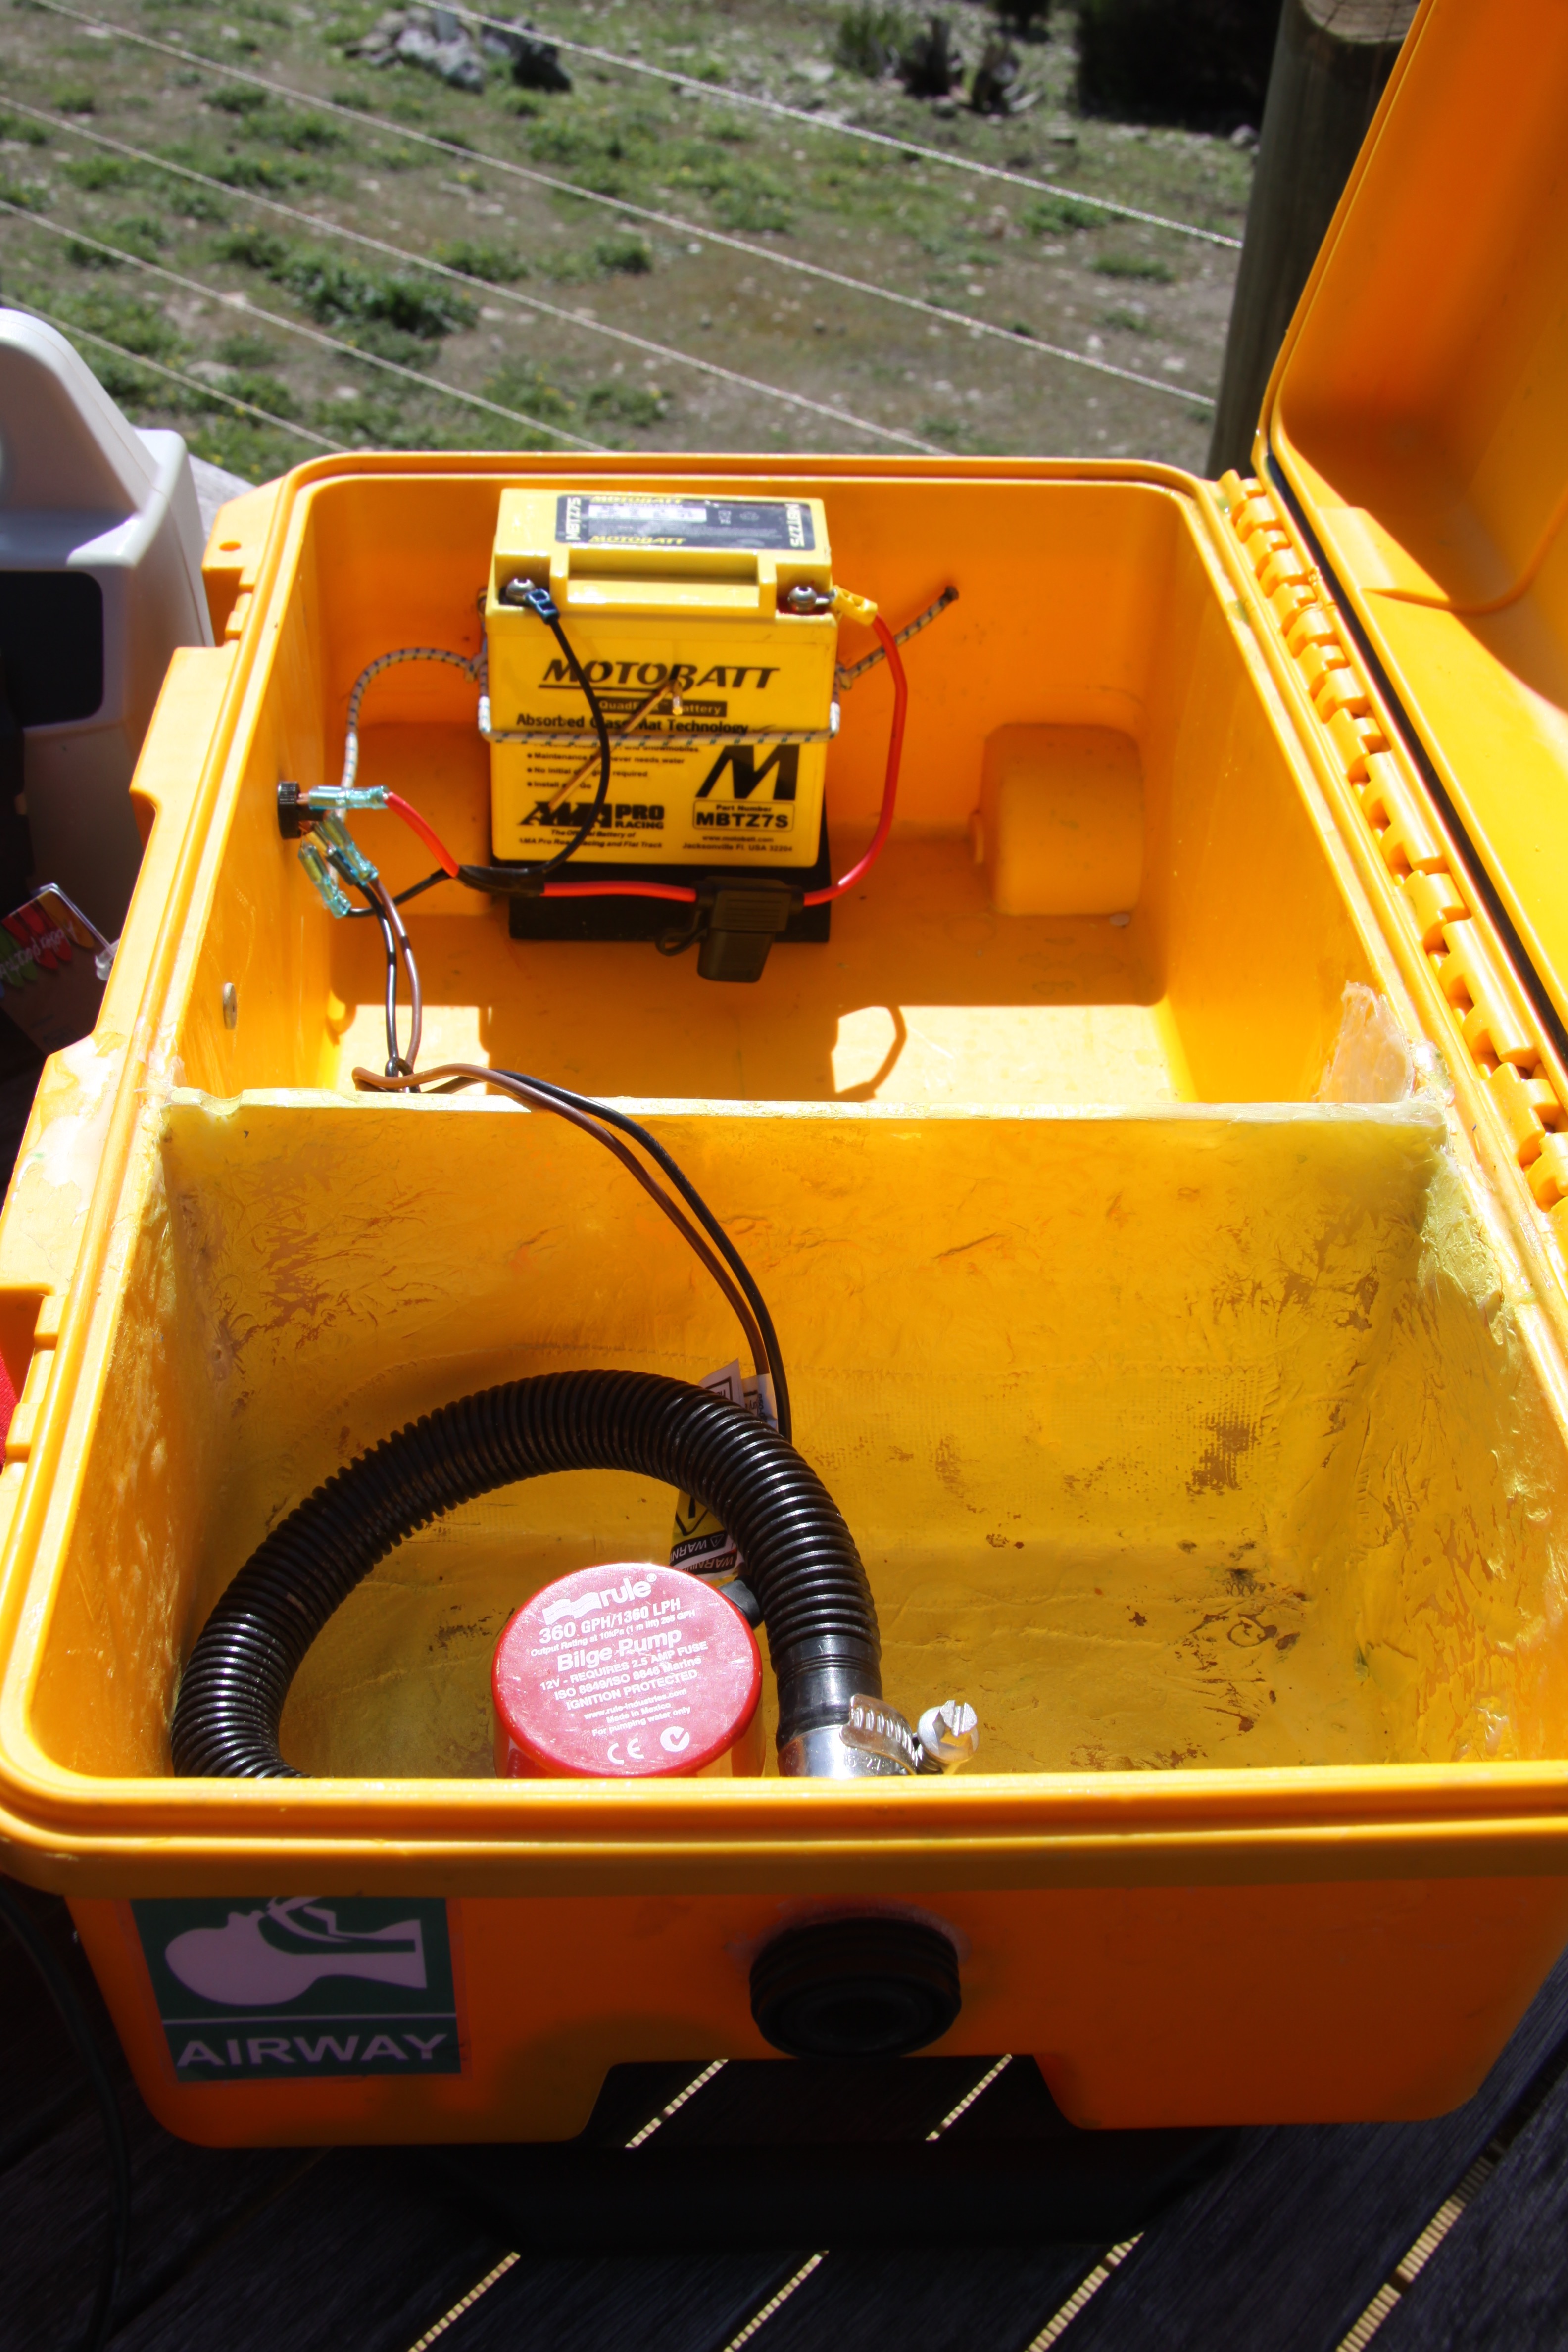
I’ve drilled a couple of holes in the case
(i) to accommodate a marine grade rocker on/off switch (with light)
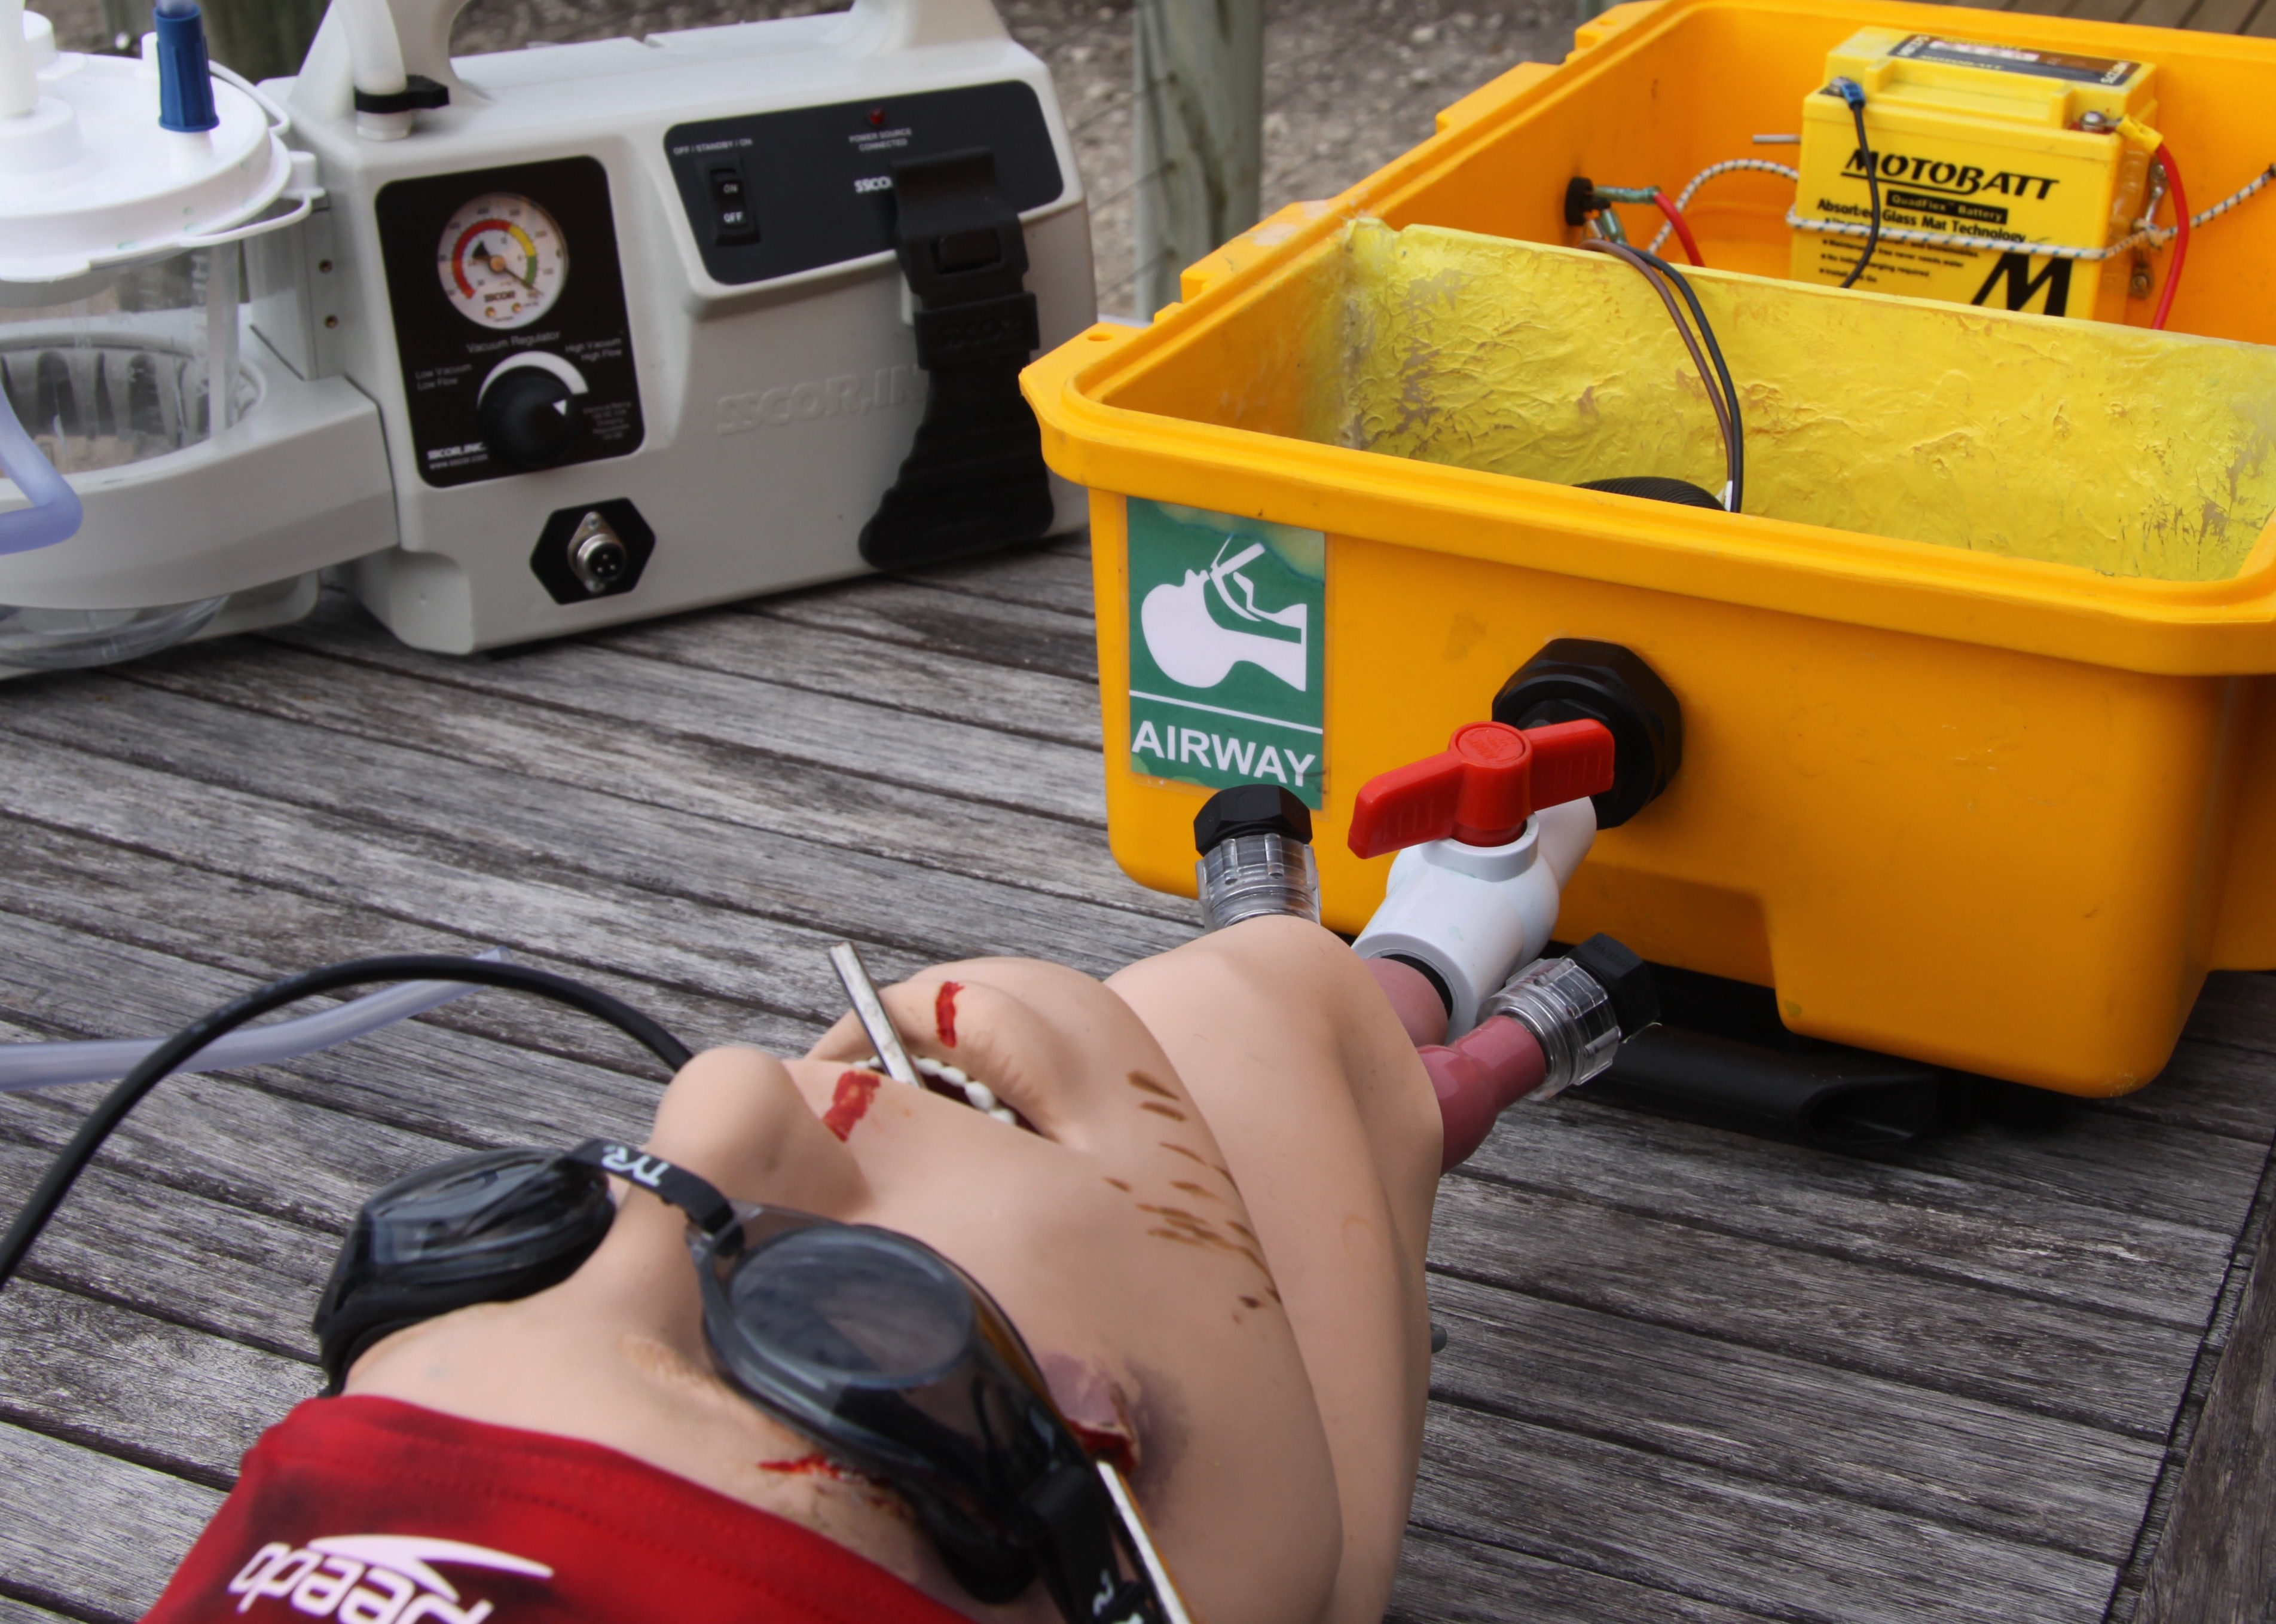
(ii) a tank fitting to connect internal pump & hose to the airway head, via socket/collar quick connect fitting
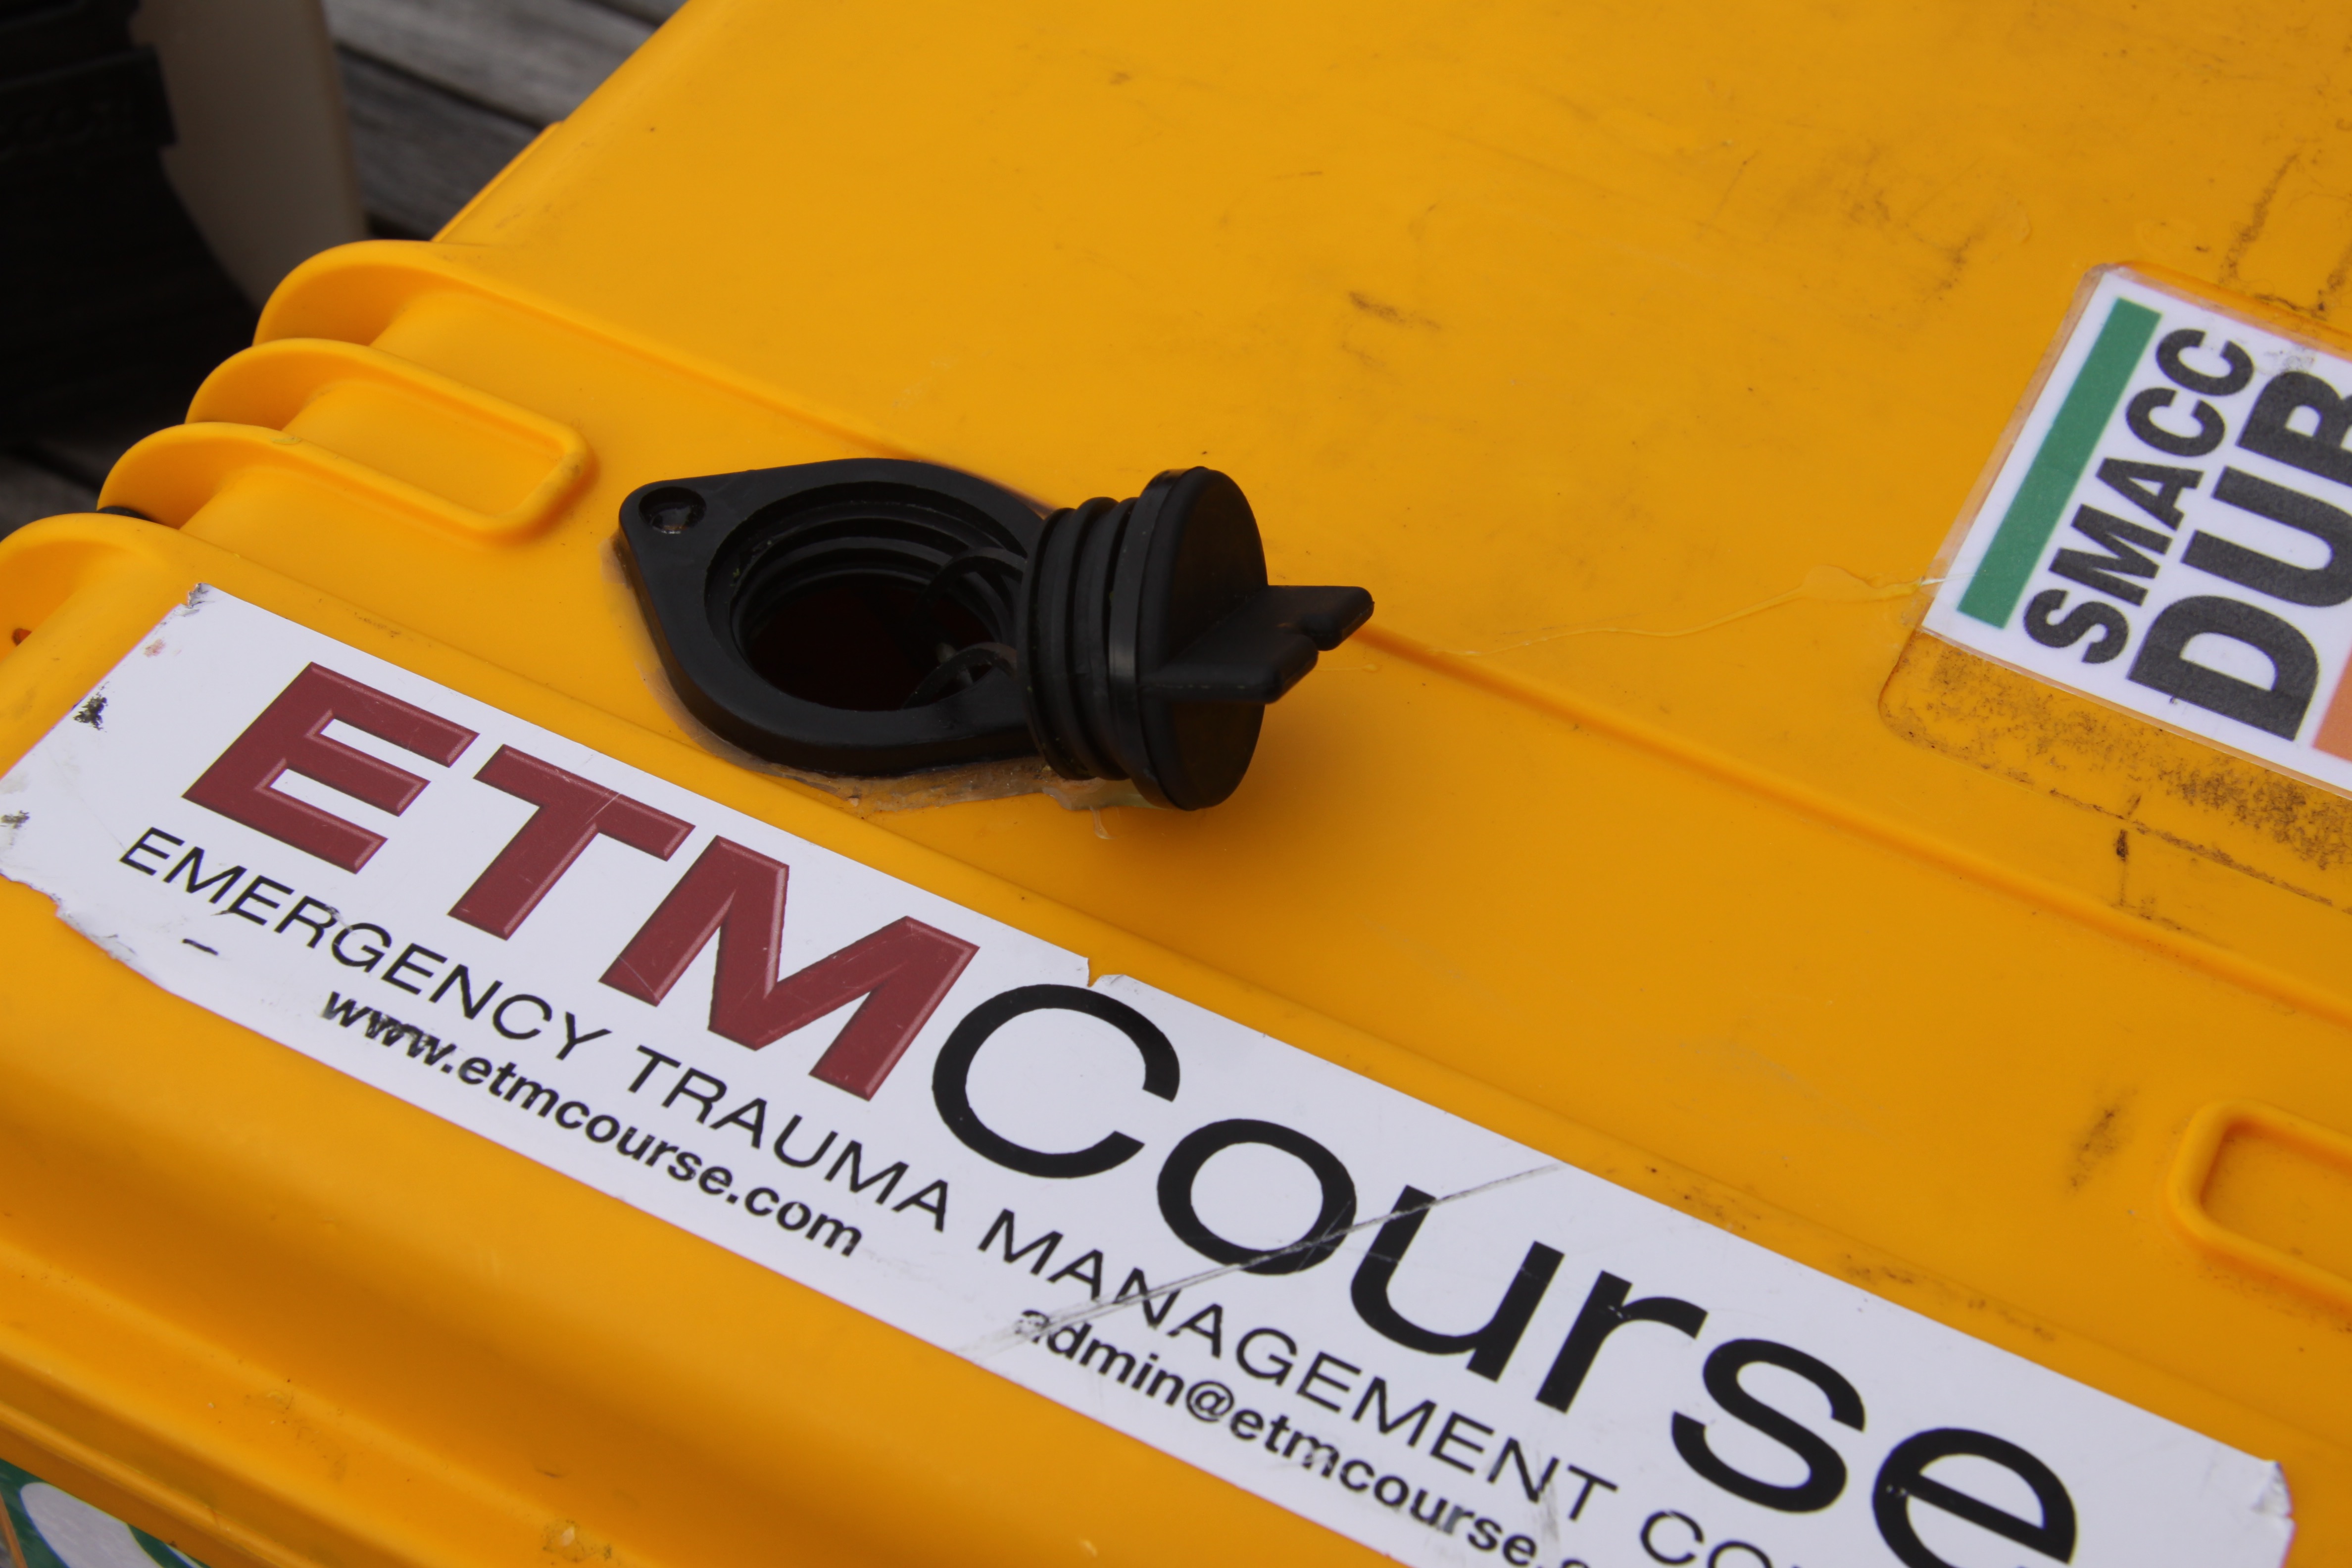
(iii) a threaded cap port in lid to allow rapid filling of reservoir with case closed
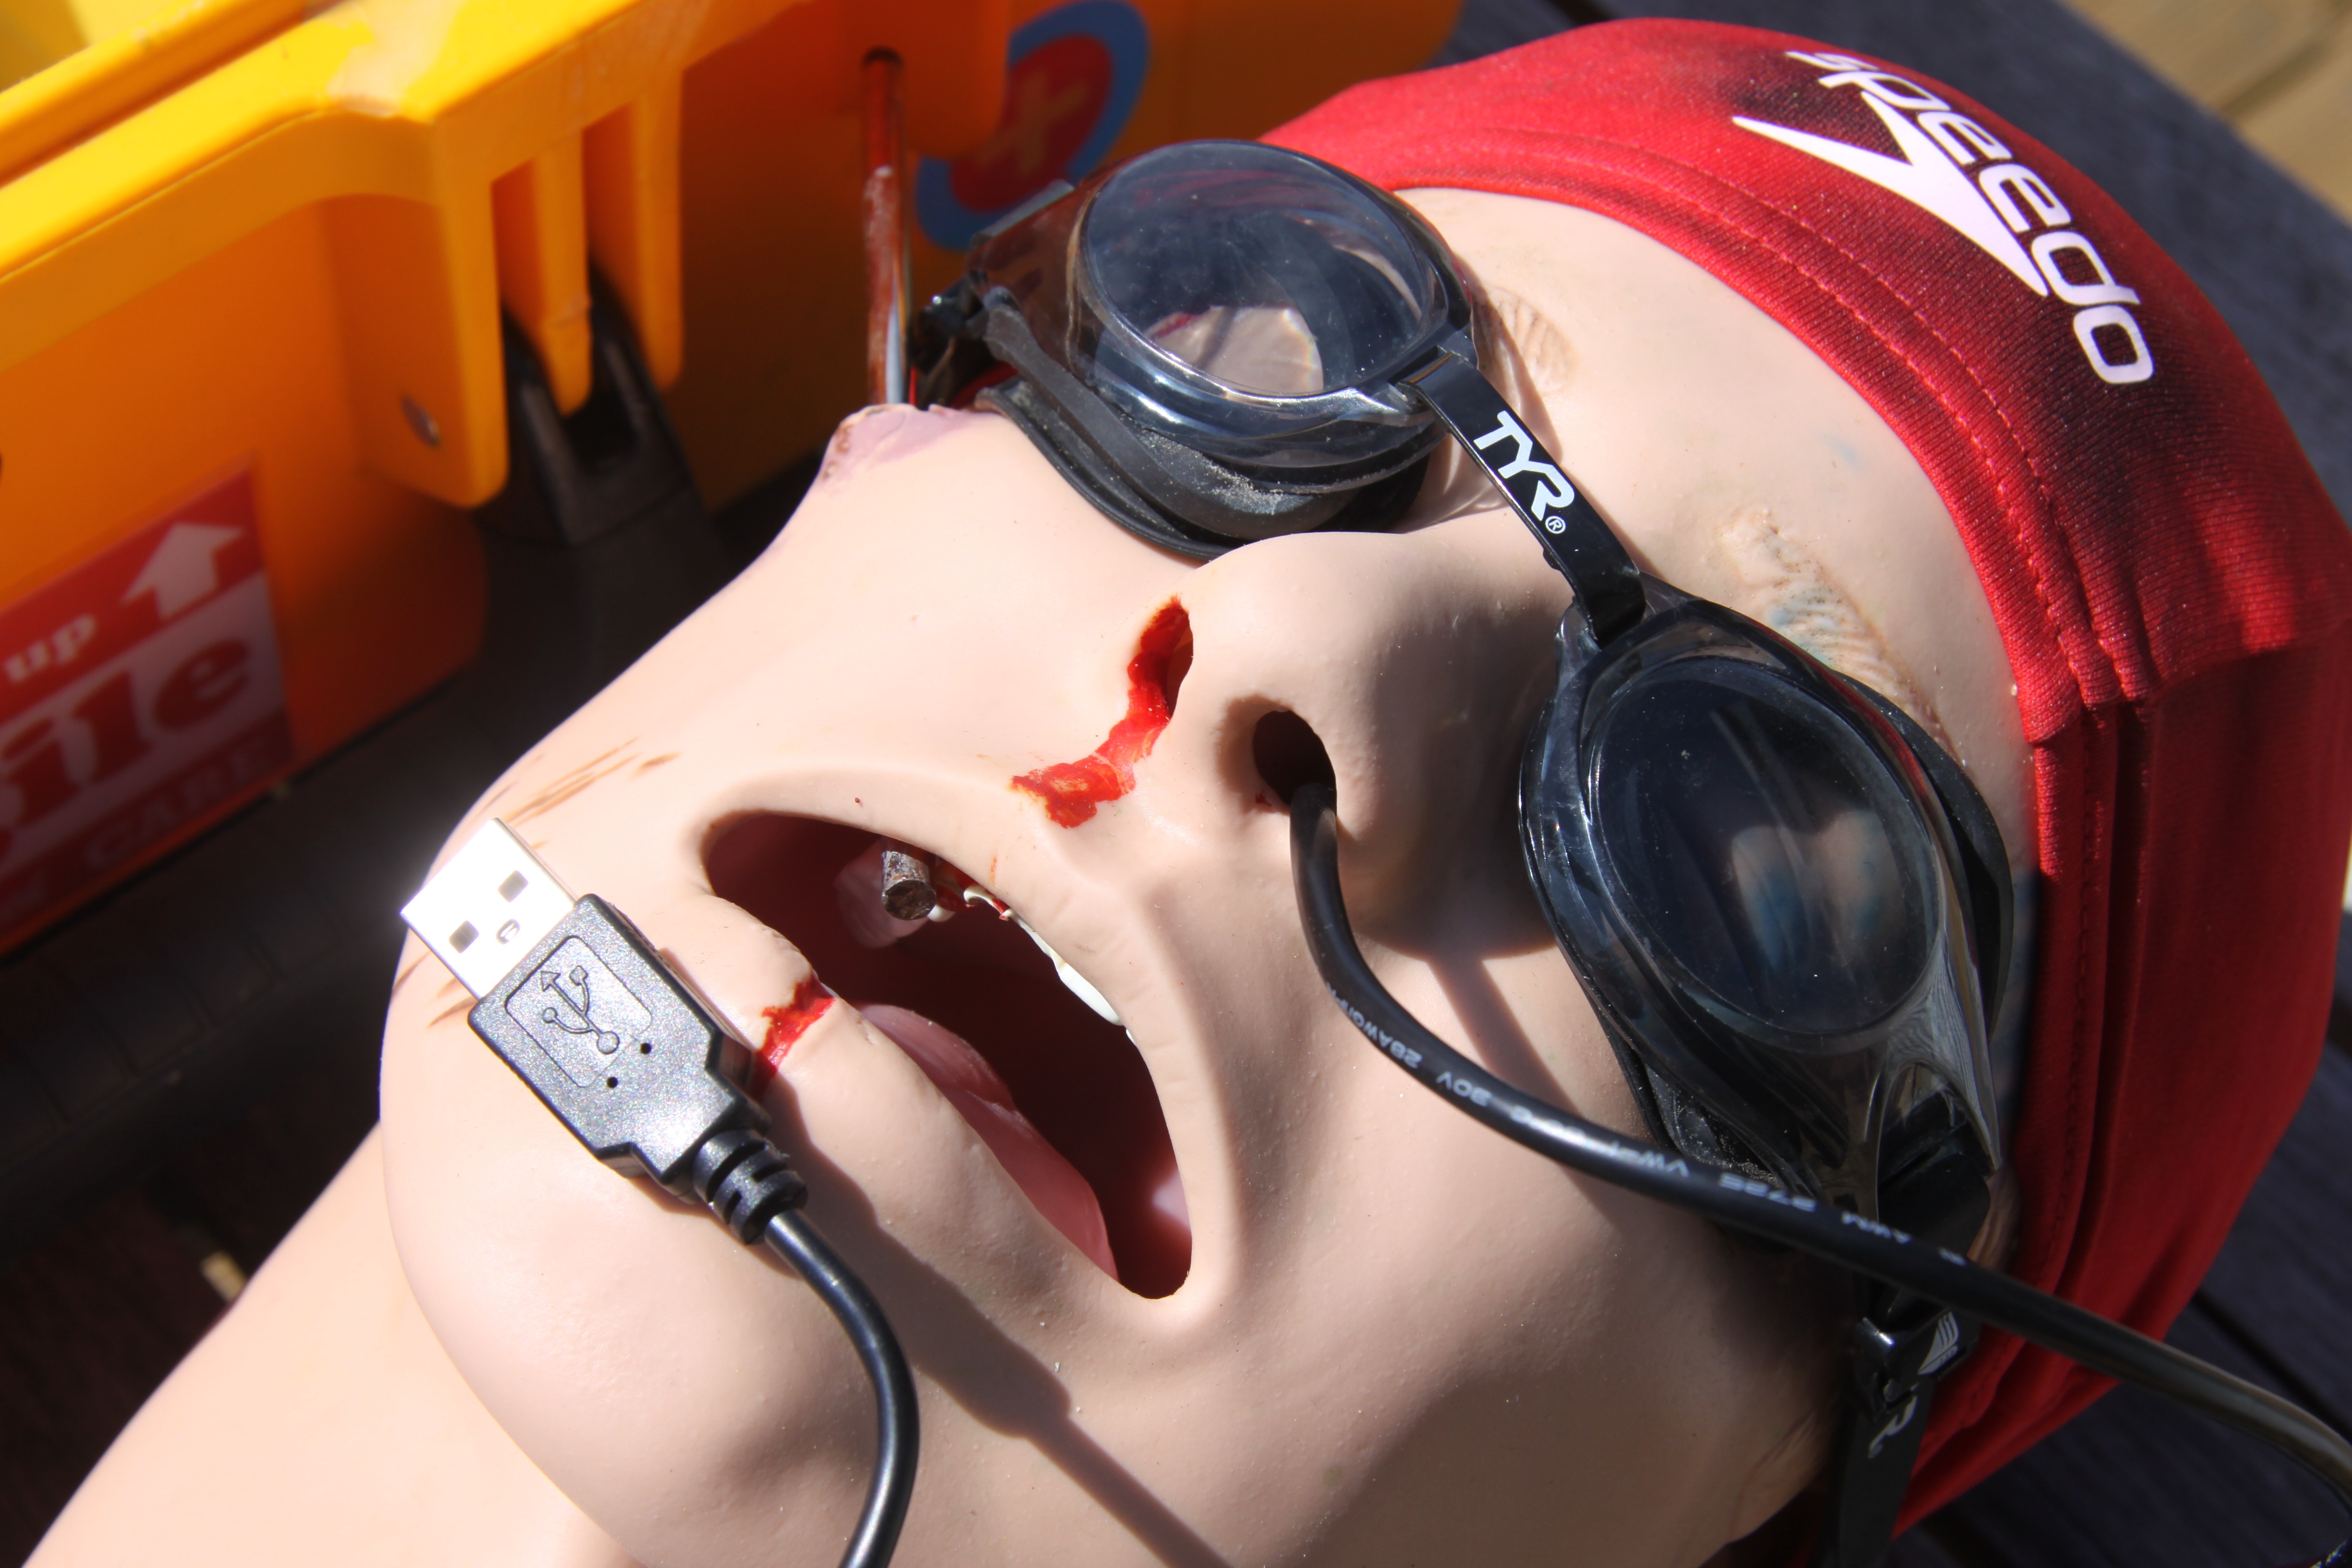
AIRWAY HEAD
I am using the Laerdal trauma head (kindly donated by Dr Andy Buck of ETMcourse.com). This head has a metal bar that can slide via the right cheek across the mouth (obviating bag-mask ventilation, supraglottic insertion and impeding laryngoscopy) and an inflatable tongue.
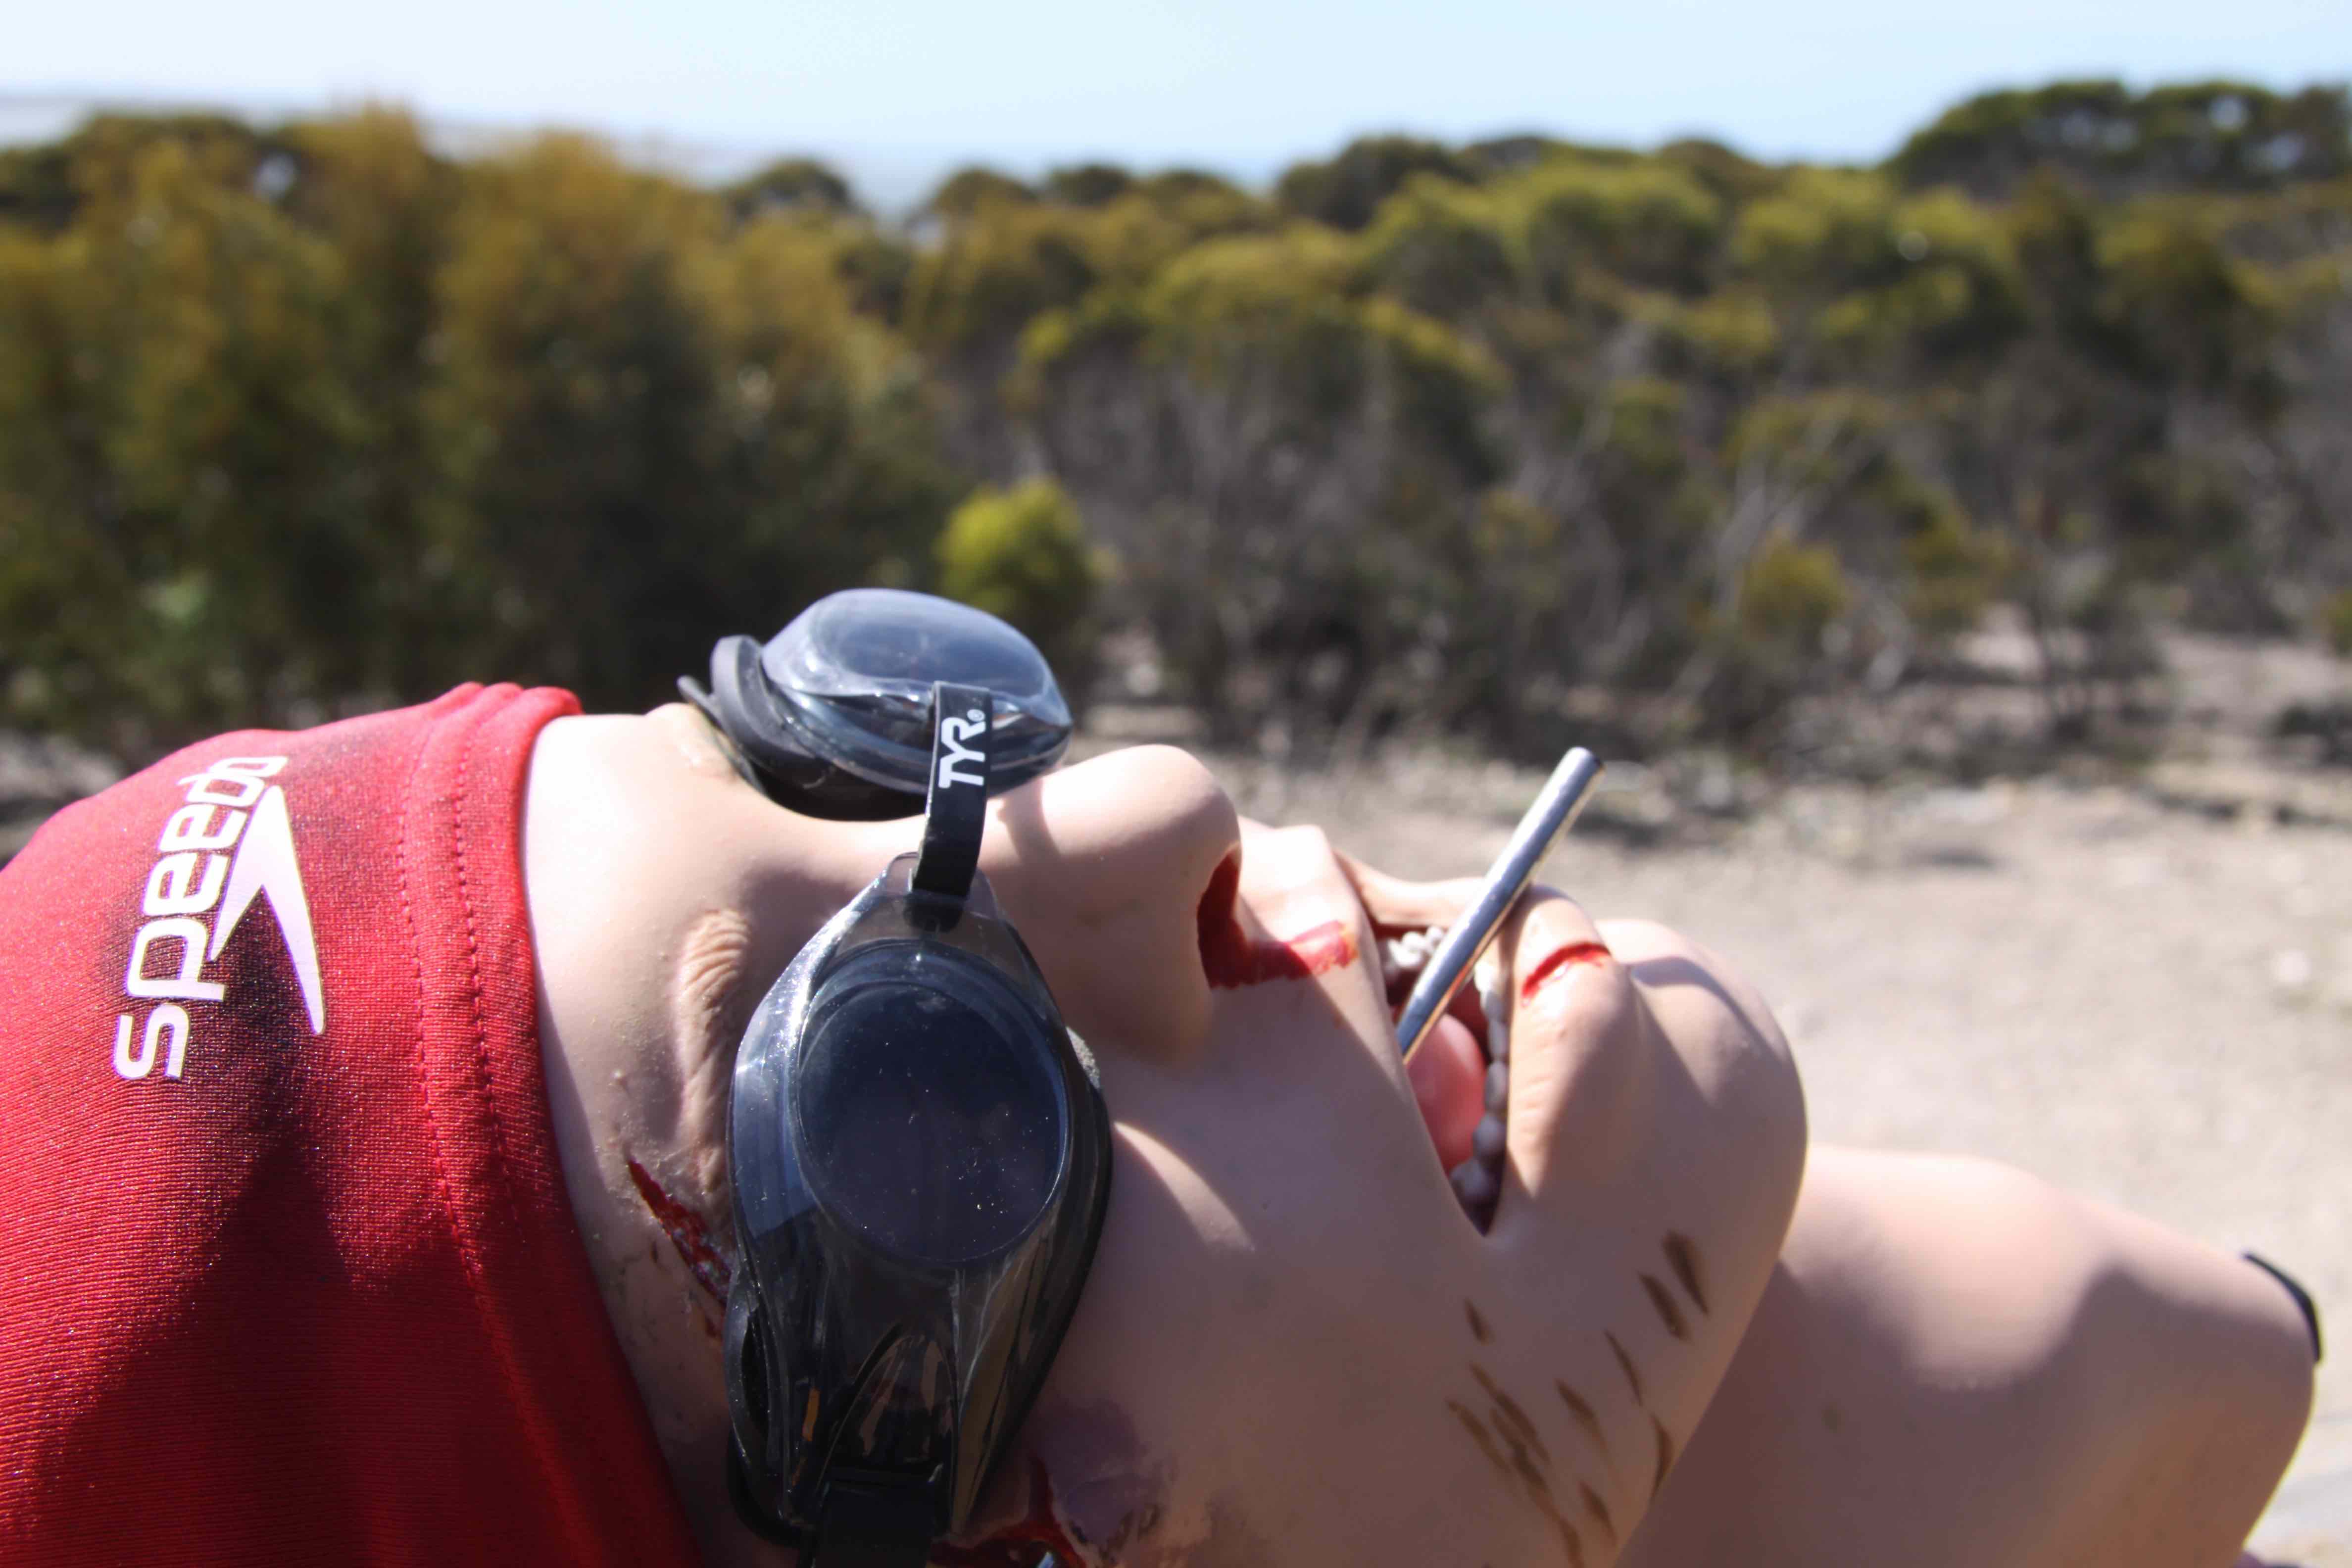
I’ve kitted mine out with a cheap USB-camera on a 2m long cable, which is placed via the left nares to allow video of the oropharynx via Quicktime recording on a Macbook.
VOMIT RESERVOIR
Jim DuCanto uses a separate reservoir for his ‘simulated airway contaminant’. I found that having another container to carry took up too much space, so have made a reservoir within the Pelican case using a sheet of perspex (plywood is fine) cut to shape and then secured with waterproof sealant. Initial experiments with Sikaflex were OK from a waterproofing perspective but failed under rough handling. I’ve now fibreglassed the divider into place, which adds to both waterproofing and strength. So far no problems with leaks despite multiple plane trips.
Simulated emesis can be made simply with water and food colouring – green for vomit, red for GI bleed. One can thicken it up using xantham gum powder, but to be honest I’ve found liquid vomit teaches the skill as much as using thickened versions. Omitting the use of xantham also saves on tedious pre-mixing and is easier on the pump!
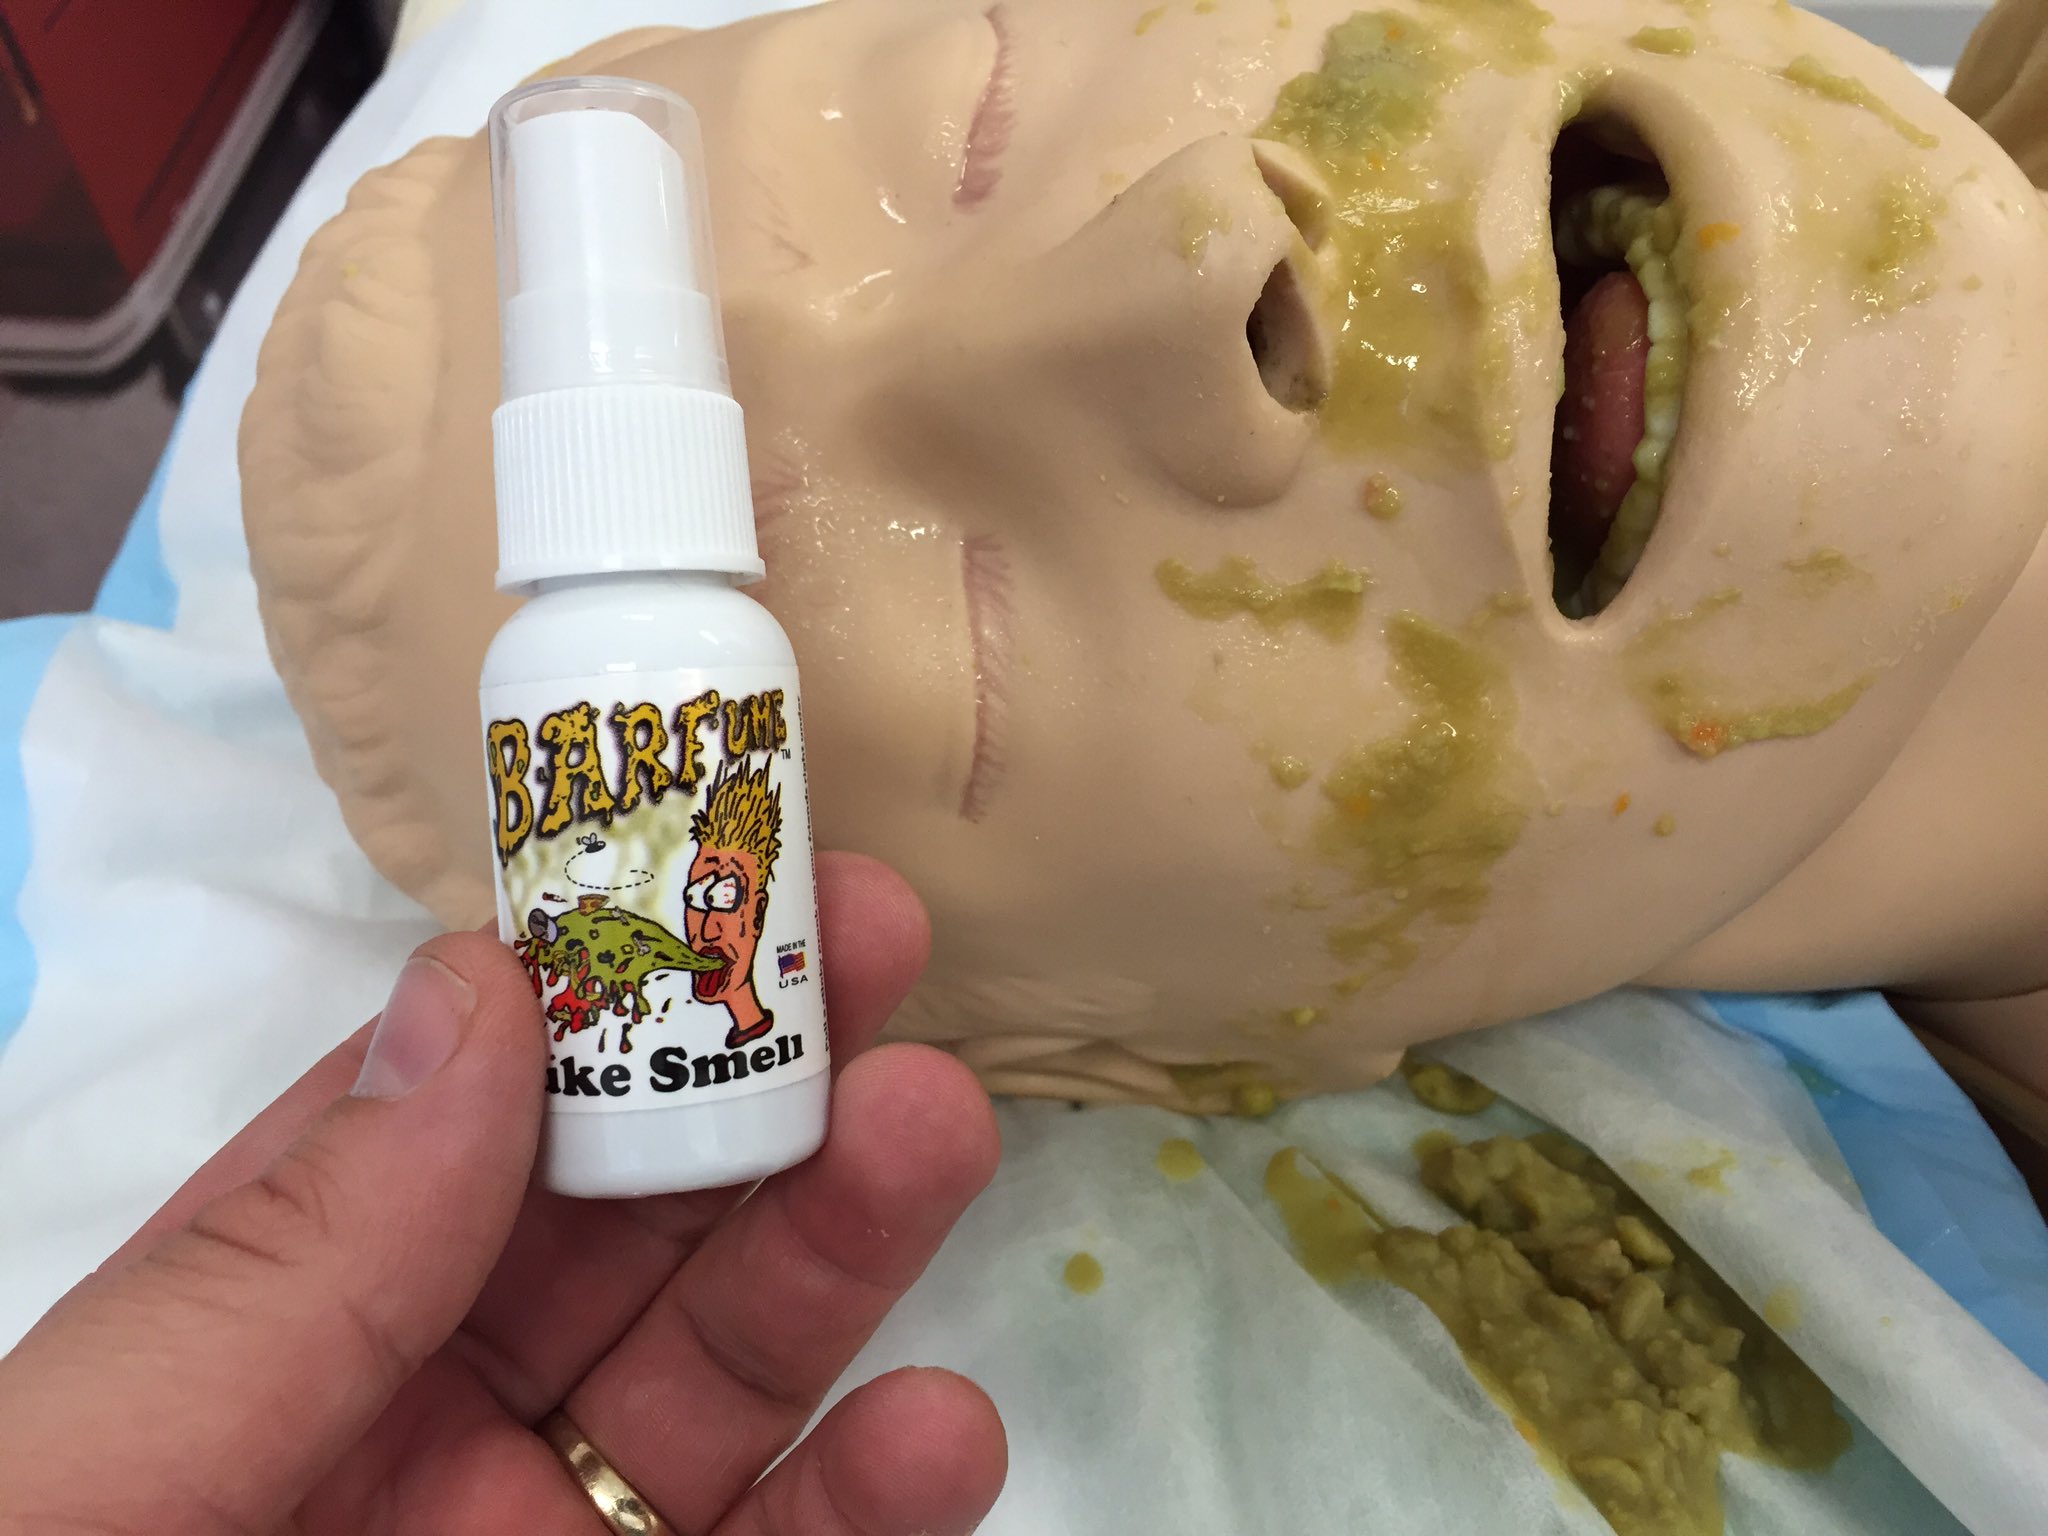
To simulate the smell of vomit, one can either use white vinegar or add ‘Barfume’ (available online from the makers of ‘Liquid Ass’ faeces odour, this is s potent ‘simulated vomit’ odour which can be mixed in with the coloured water). Kudos to sim ninja Michael Borrowdale for this one!
Using barfume means props are small and easily packed, as opposed to having to carry around litres of white vinegar or source at destination!
PUMP & HOSE CONNECTORS
Rather than use a large grey water pump and variable control rheostat to control the flow, I’ve found that a simple Rule Bilge Pump (360-500) is more than able to cope with pumping simulated vomit/blood. Flow rate is adjusted by an inline valve which can be turned from full on (impressive spurting out of mouth, nose, eyes) through to intermittent bursts, down to a steady trickle or just ‘off’.
The inline valve is connected to a simple threaded hose fitting placed in the oesophagus of the airway head and secured with a worm-screw clip. The lungs can be left in situ, or removed and bronchi plugged with barb caps (saves on subsequent cleaning of the lungs).
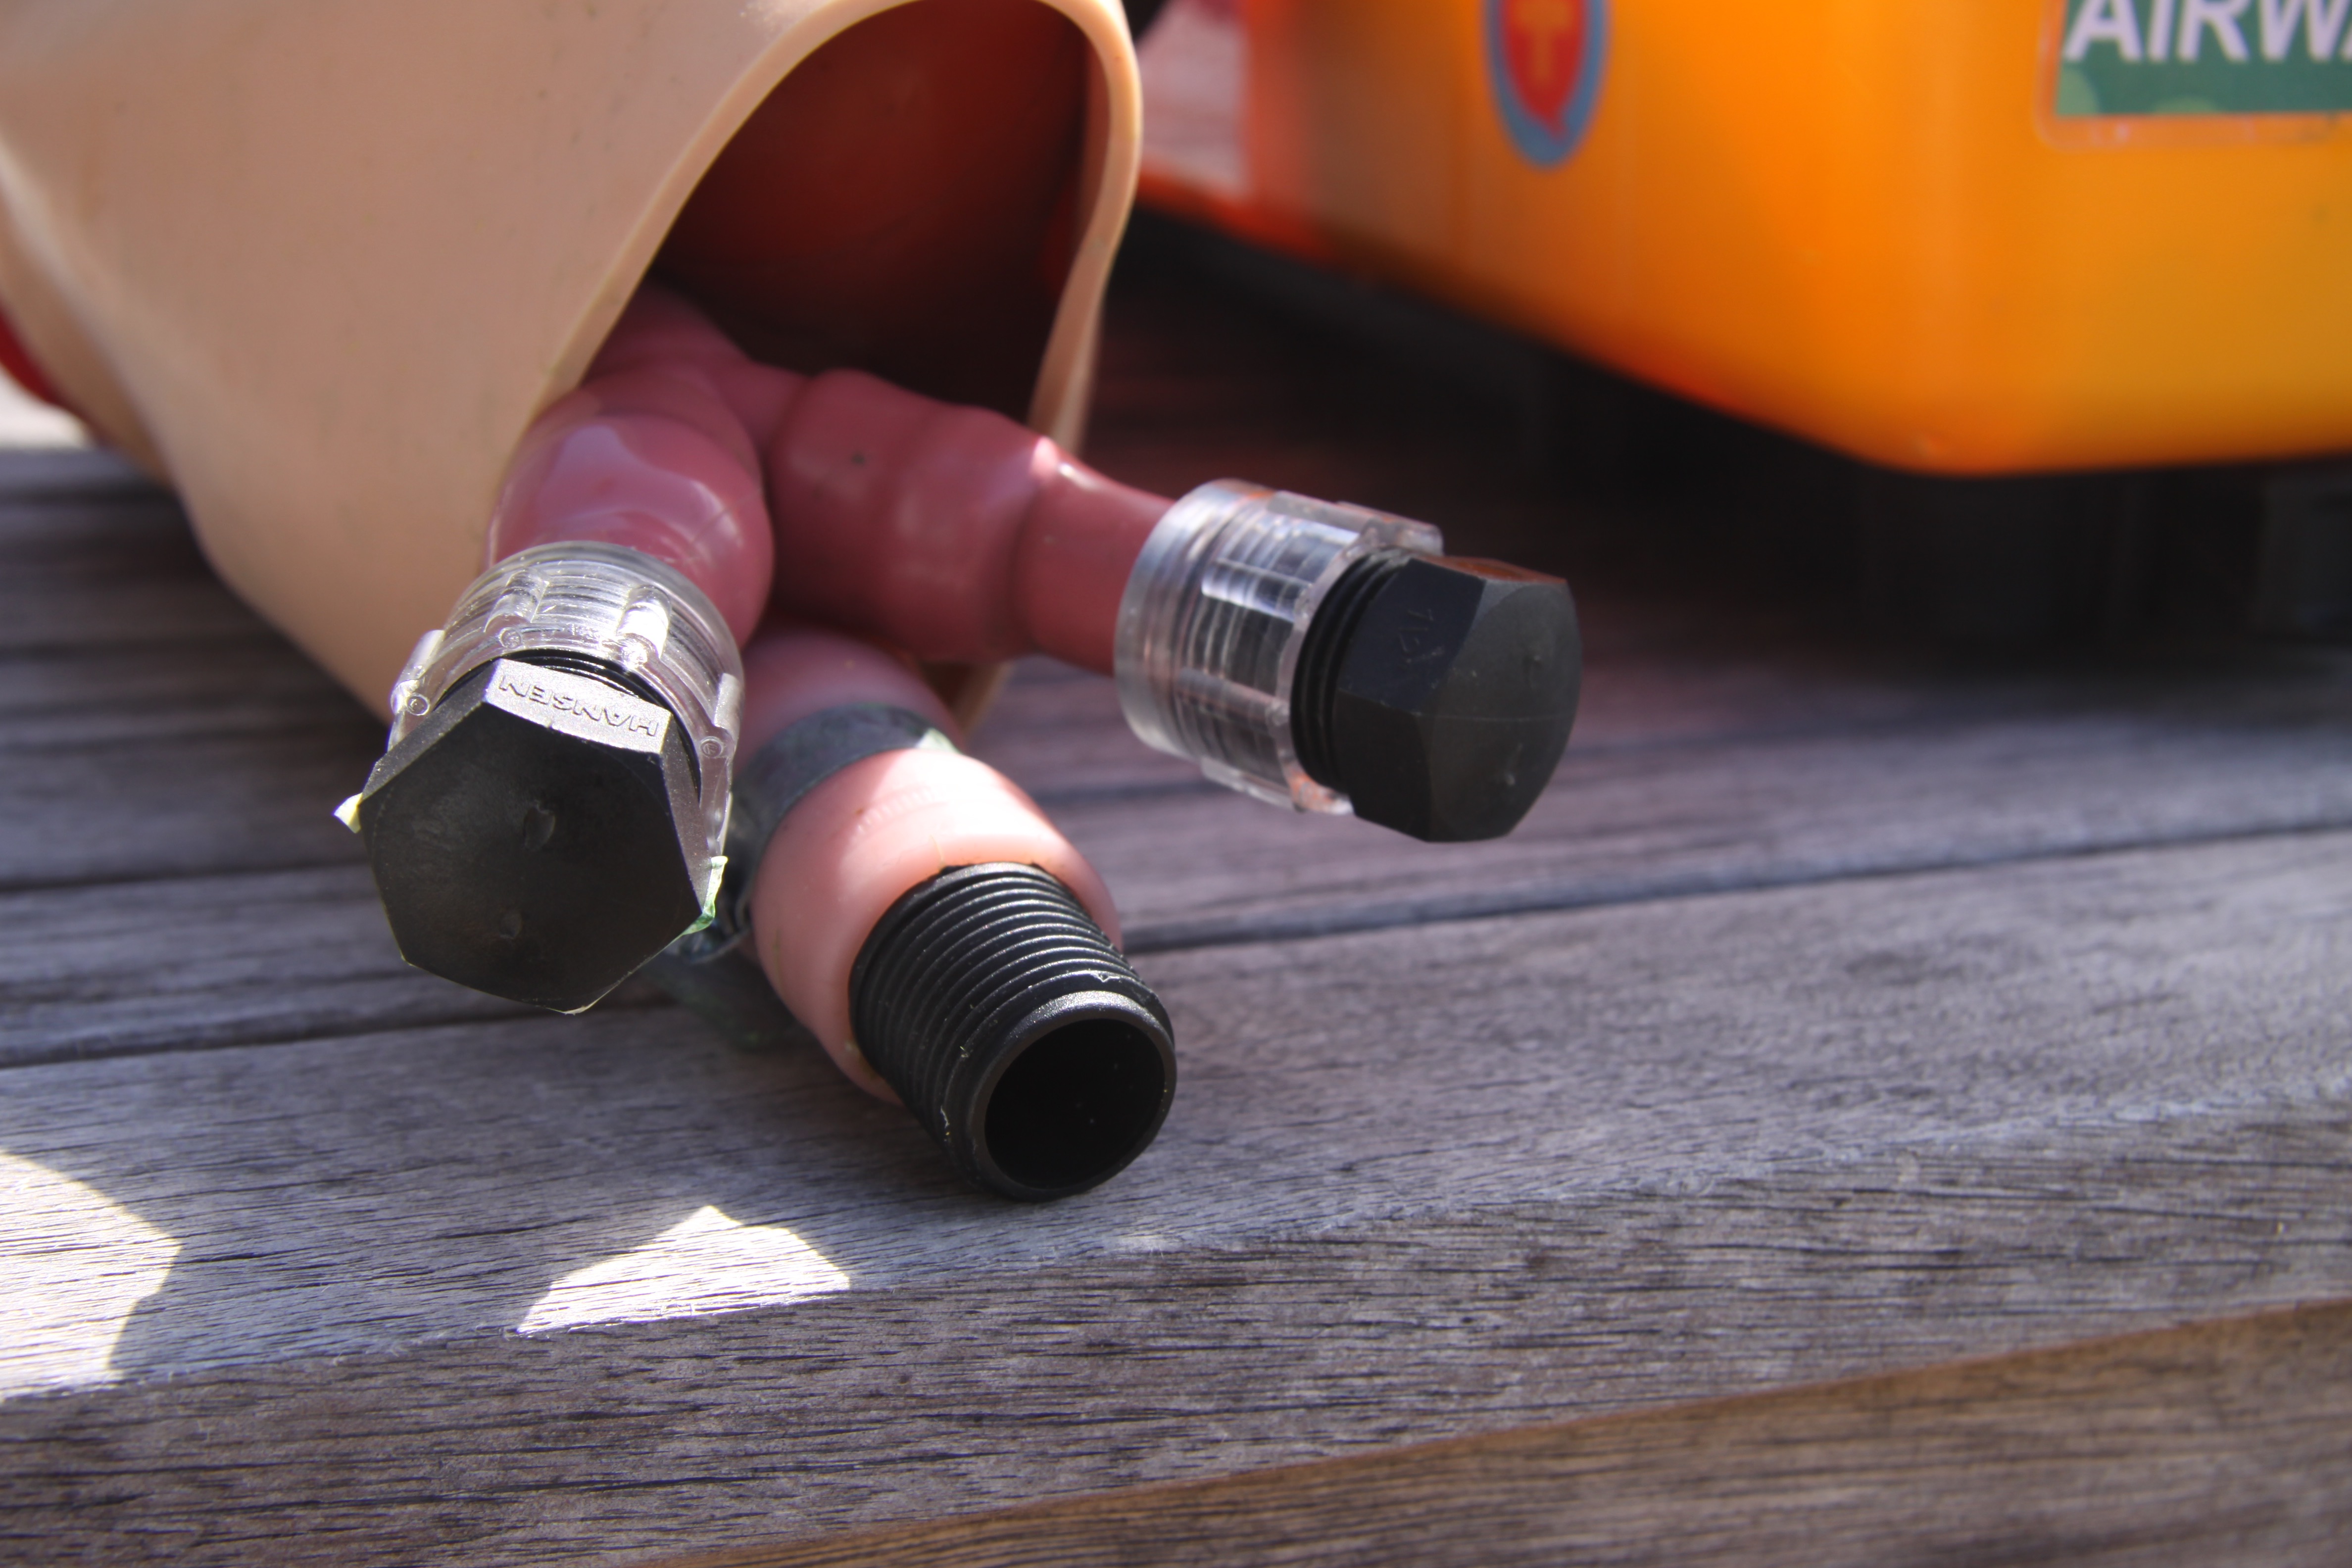
With the head stored in the Pelican case, it’s important to be able to connect/disconnect easily. I have used standard plumbing fittings from the local hardware store.
A tank fitting is placed in a hole drilled at one end of the Pelican case and connected to the pump via flexible hose, secured with worm screw clip. The inline valve (flow control) is then attached to the head and the whole assemblage can be attached to the tank fitting. Importantly neither head nor tank need to be rotated; the collar/cap fitting allows connection with a few turns only until tight.
POWER SUPPLY
I took advice from the local marine store and have used a 12V MotoBatt battery which can be recharged. It’s secured in place with bungee and connected to a marine-grade rocker switch on the side of the Pelican case. This means the vomit reservoir can be filled, the head connected and case closed – with pump turned on/off via the switch out of view.
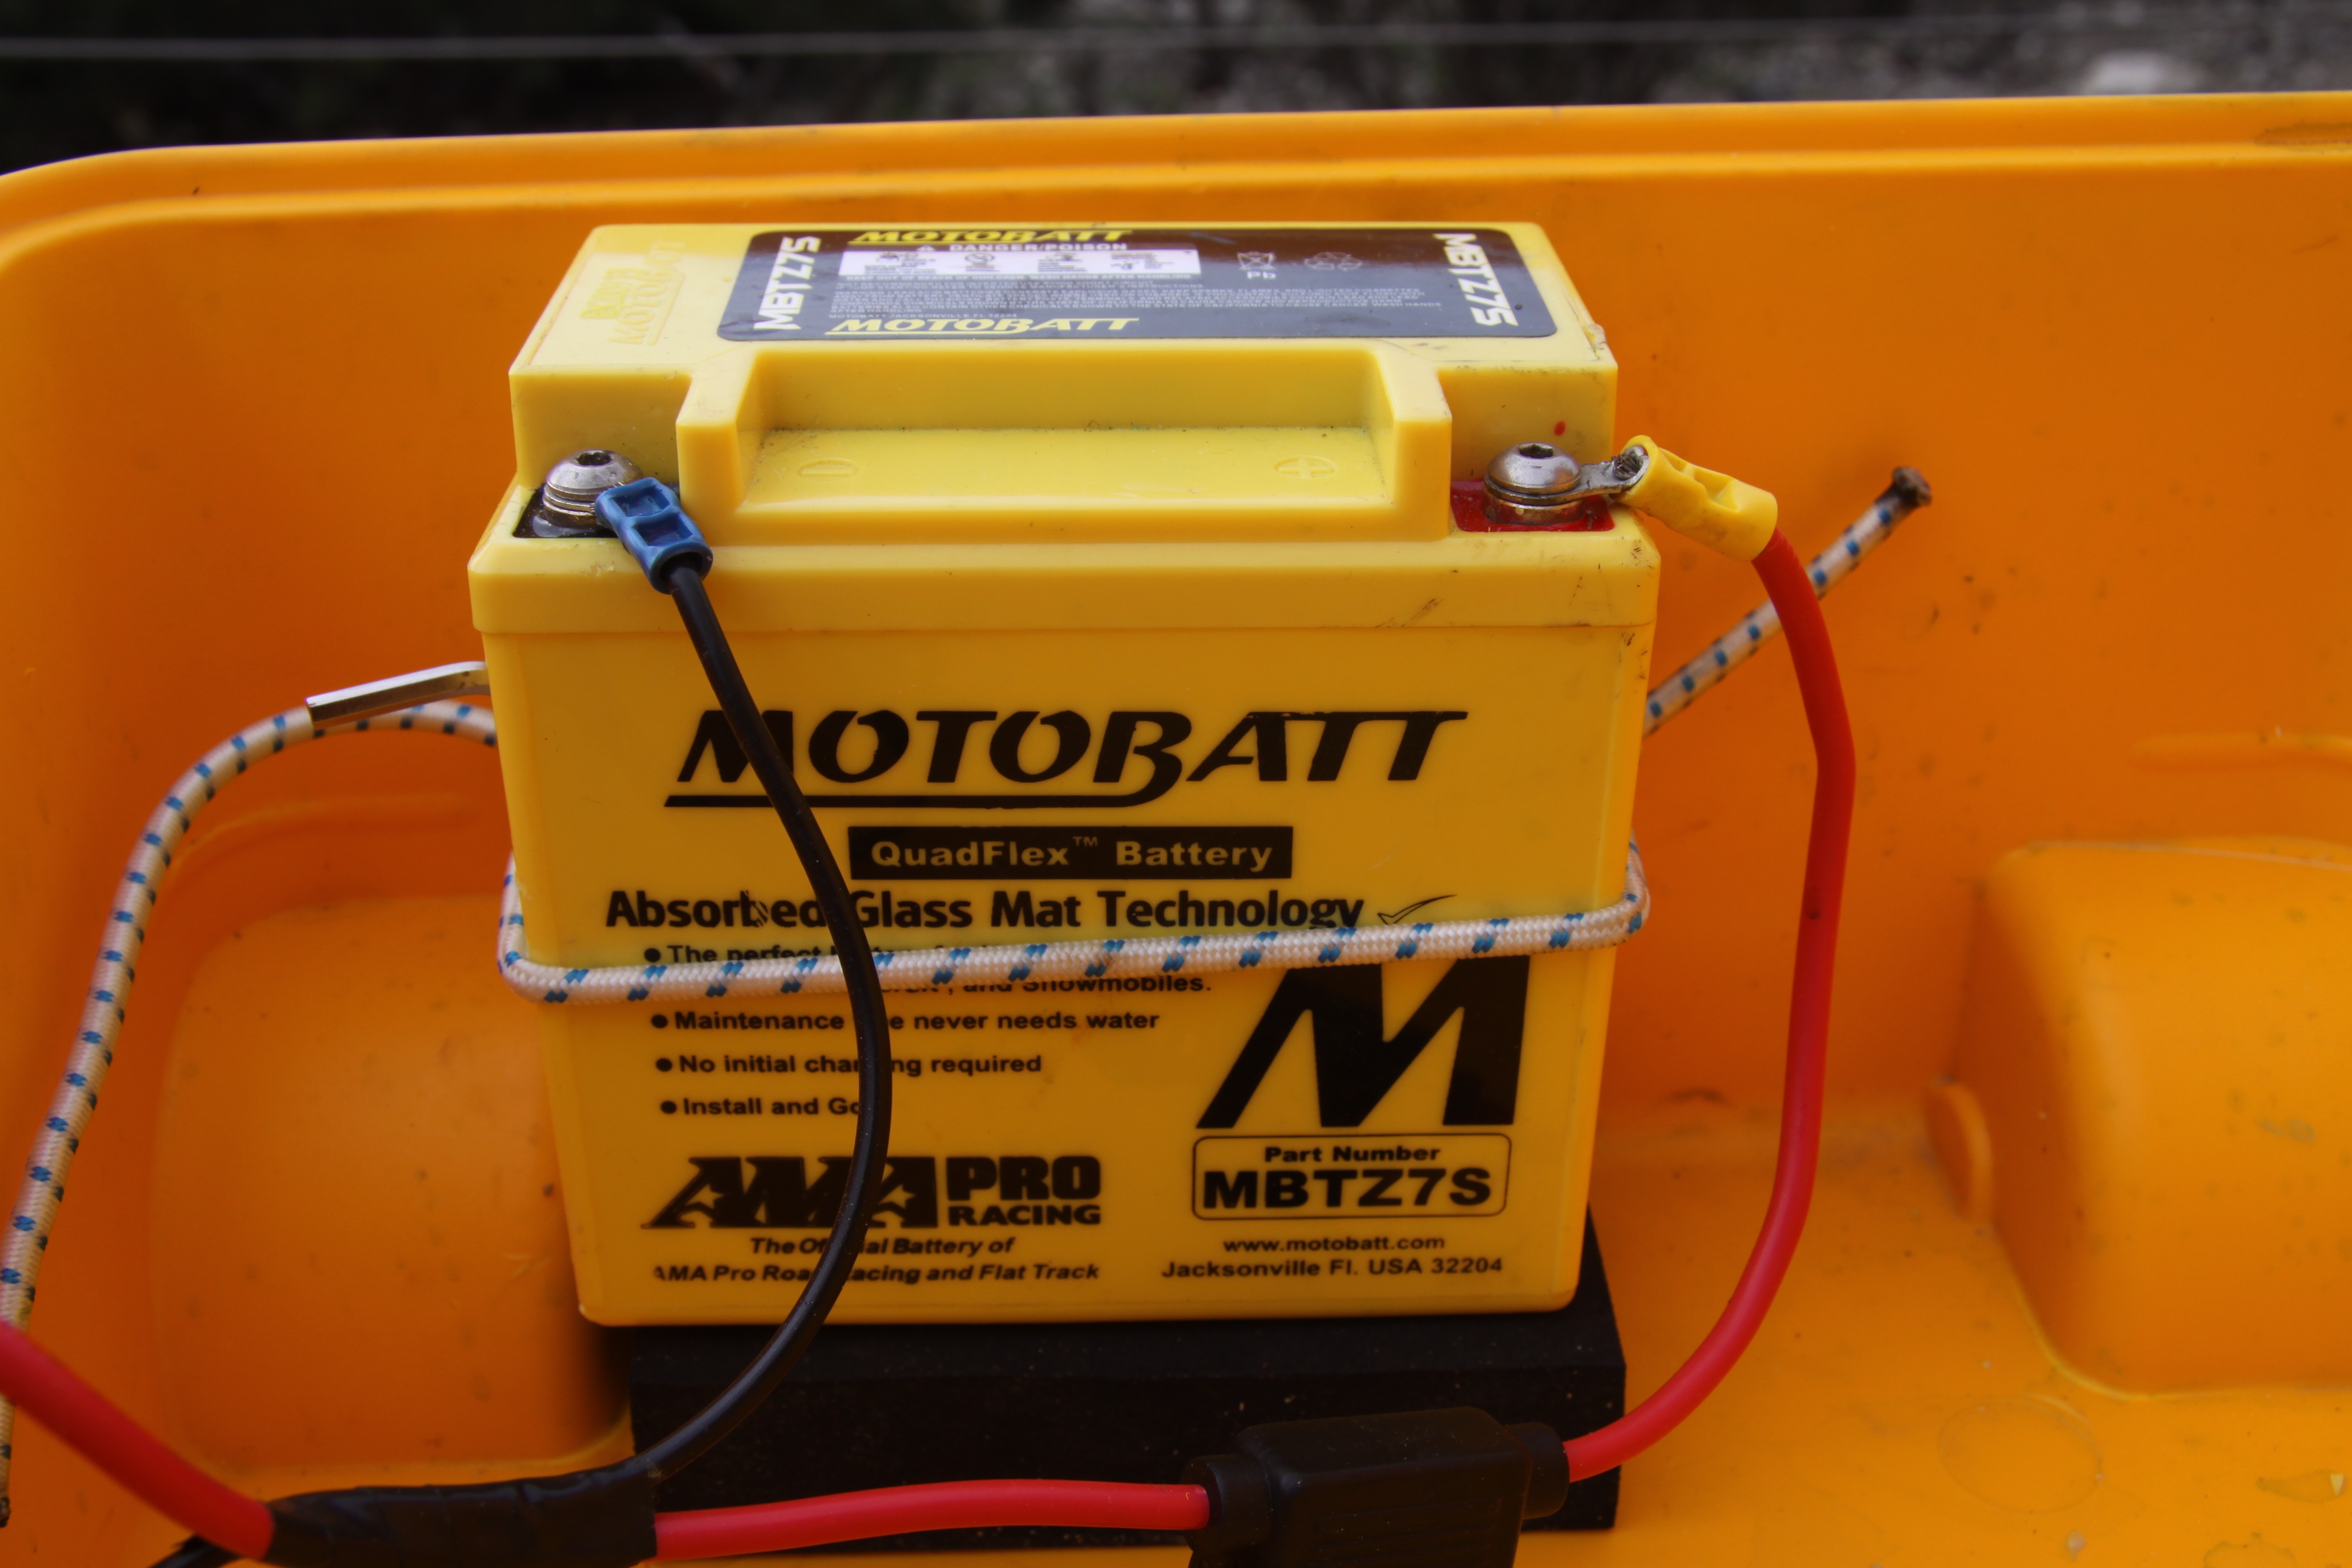
Having portable power means I don’t have to carry cables, worry about power supply at destination nor risk electrocution.
The MotoBatt battery is able to be carried in both ‘carry on’ and ‘checked’ baggage with airlines if is considered part of installed equipment, but do check beforehand as limits may apply based on Watt/Hours (typically less than 100 Wh). Rules regarding carriage of batteries as ‘spare’ or not connected to equipment should be checked before travel.
The Australian Government Civil Aviation Safety Authority have a ‘dangerous goods’ app for iOS, or check out the information on batteries online, as well as with individual carriers.
I make a point to disconnect the battery from switch, protect terminal, cover switches (secure in off position) and discuss with airlines/border protection if any concerns. especially as am also carrying what appears to be a human head onto the aircraft…
Put it all together and you have a portable ‘vomiquin’.
There’s space in the box for a couple of laryngoscopes (both DL and VL), spare suckers, bougies, ETTs, syringes, Barfume, food colouring, collapsible buckets and so on.
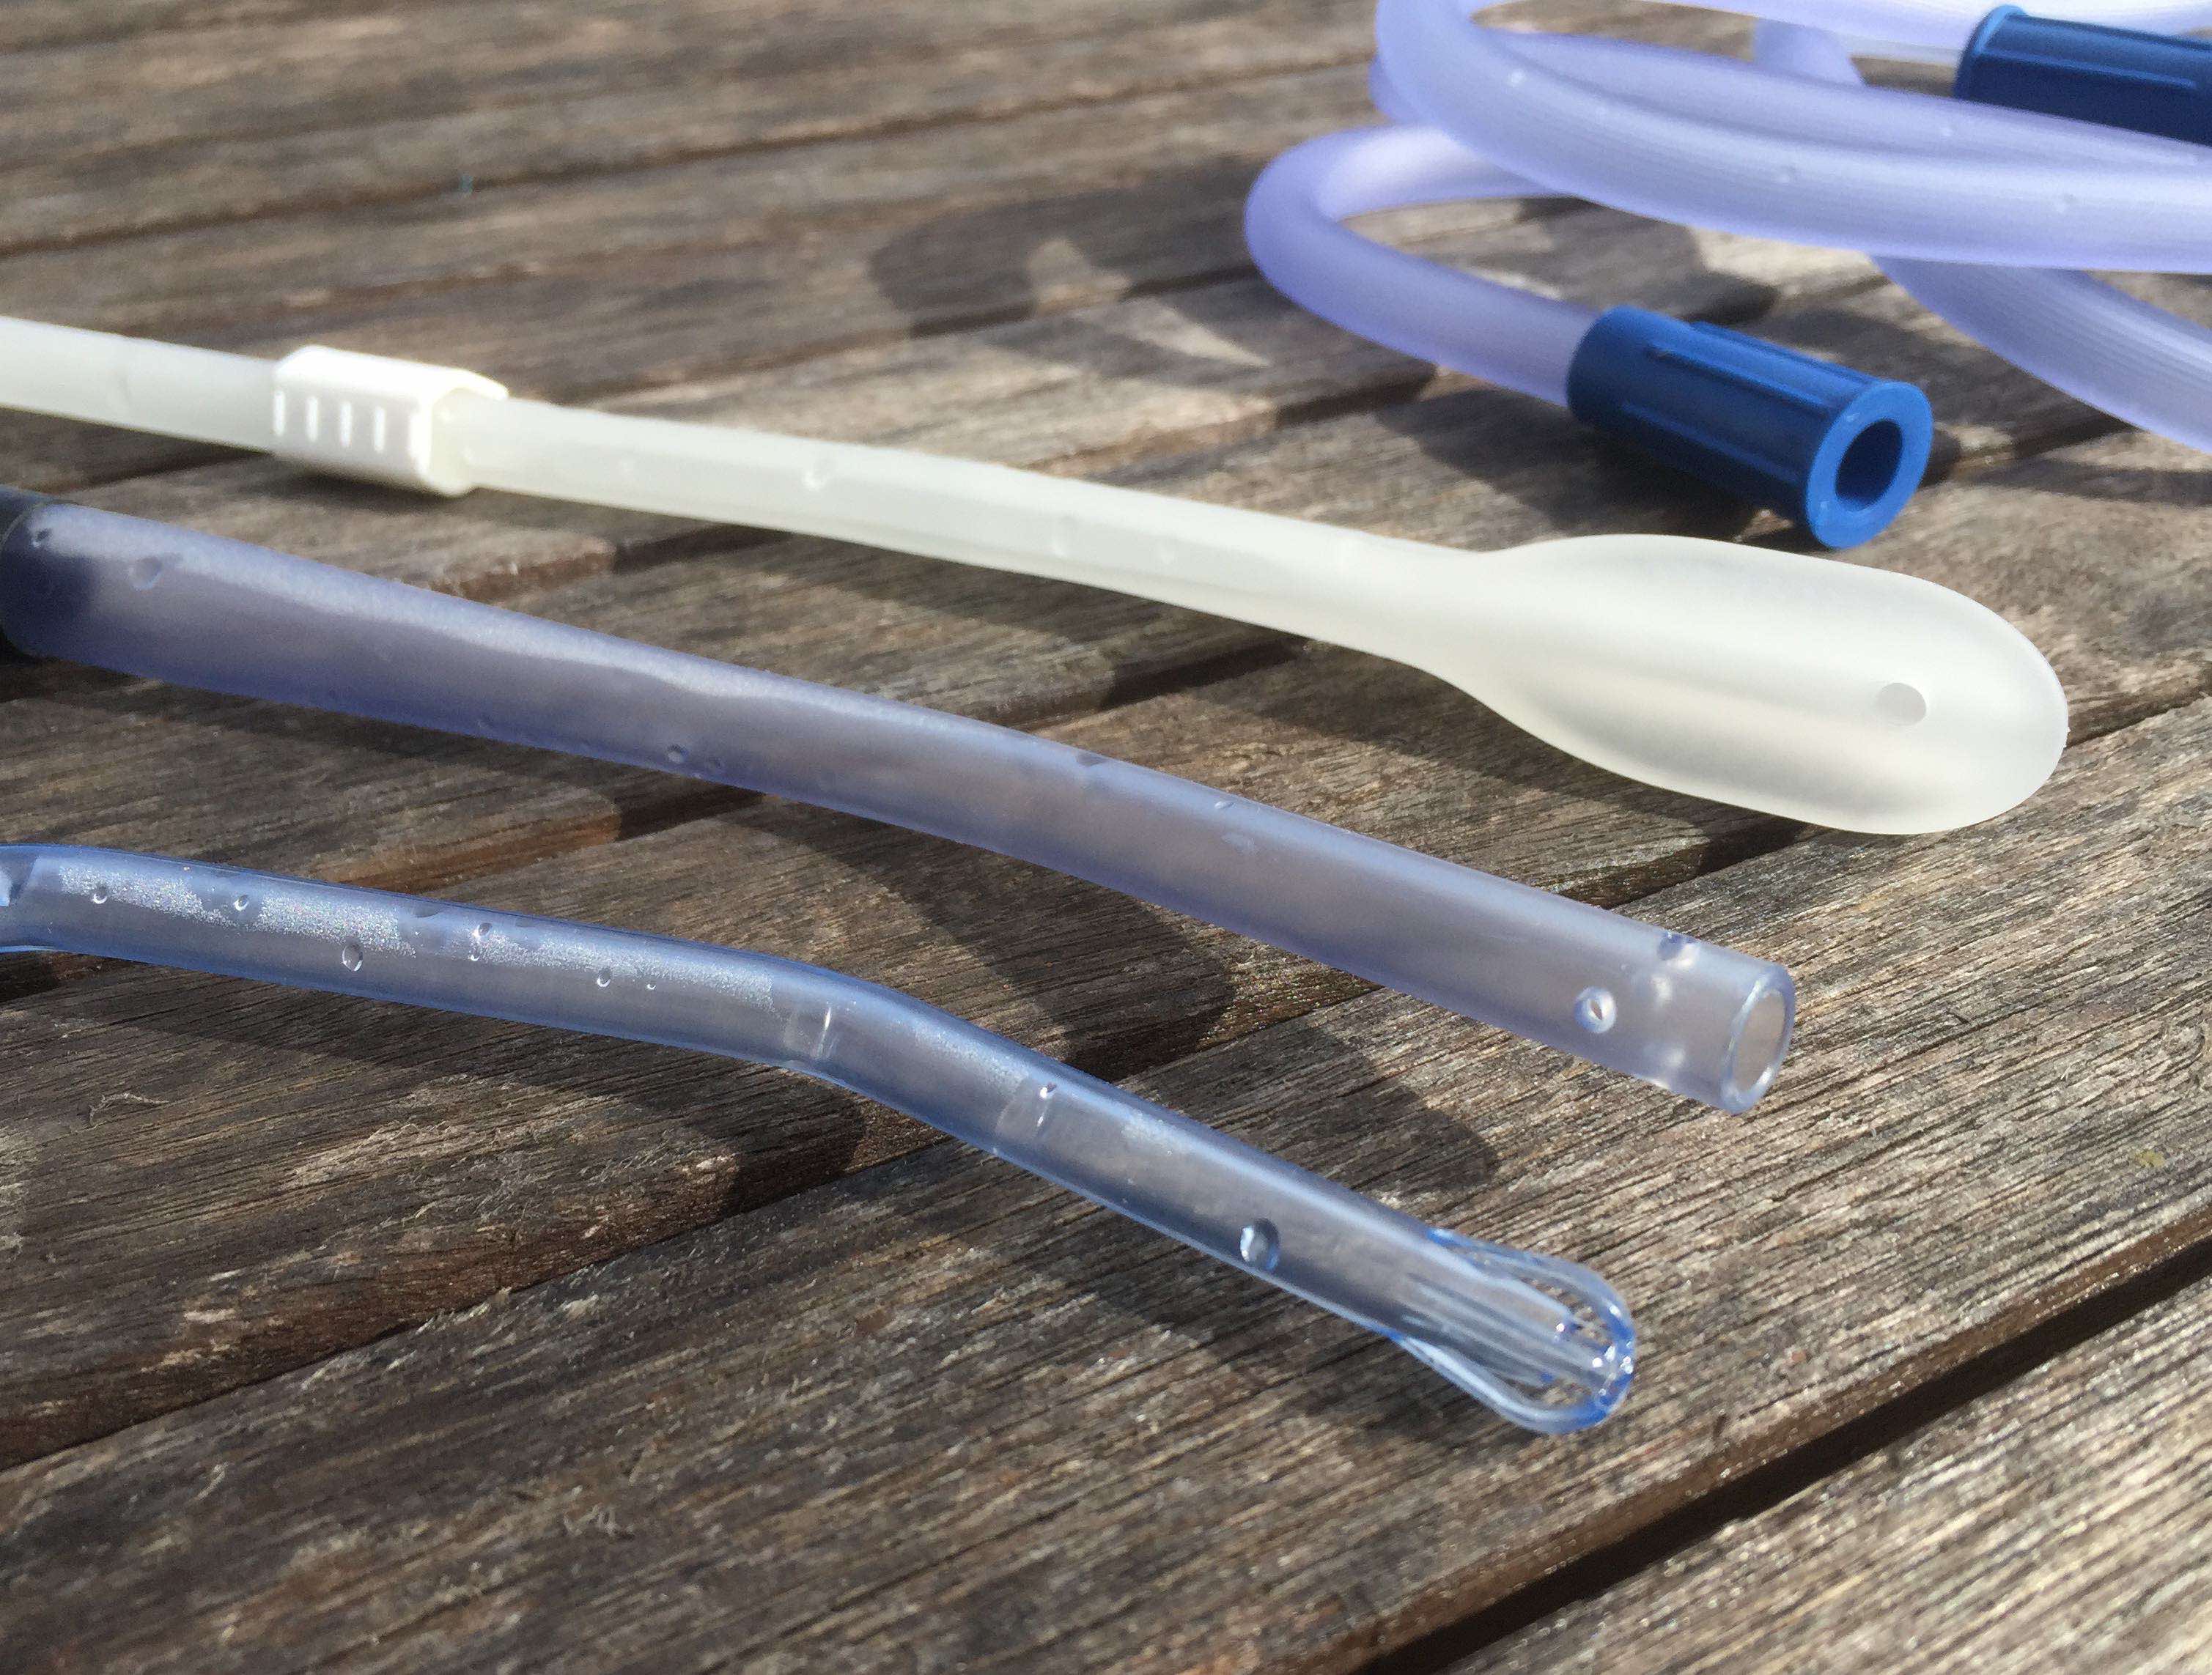
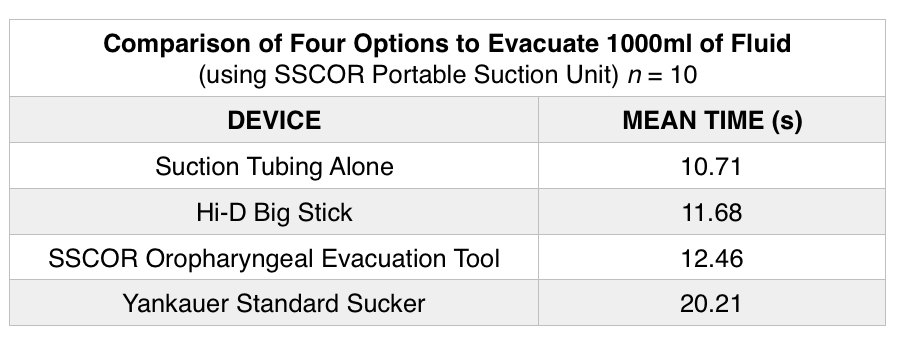
I have been trialling different suckers – the traditional Yankauer sucker vs open tubing vs the SSCOR Hi-D and ‘oral evacuation tool’ suckers. Some fascinating preliminary results for flow rates of various options…
Sadly the current set up doesn’t have space for a suction unit – ideally this is available on site, but if not it will need to be carried in another bag.
So – that’s it. How to make your own vomiquin using parts in most hardware store, and which can be easily packed up and transported (just empty the vomit reservoir using suction and dispose down sink). I can generally get this set up in under five minutes and pack away in same time (provided the suction works and a sink is handy!)
https://vimeo.com/185109587
Was it a success at the Critically Ill Airway course? Judge for yourself? I think Chris Nickson’s smile says it all…
Coming next on KIDocs :
– comparison of different suction devices (Yankaeur, Hi-D, S3, tubing)
– other techniques for dealing with massive emesis (intubation in head down position to avoid aspiration, intubation in left lateral, deliberate intubation of oesophague with 9.0 ETT to divert GP bleed etc)
You are taking the idea of the rural GP anaesthetist being a medical ‘Macgyver’ to the next level! Now crossed over into DIY.